
The conclusions made in the previous chapter definitely prompt choosing distorted, “dirty” colors as a way of harmonizing colors in an image. Not all images, however, invite such treatment. Adding an extra hue (a warm one, for instance) to all colors in the picture may give the entire photograph an extra coat of semi-transparent tint that you will want to ‘brush off’ the surface. Other methods of color palette harmonization (such as decreasing saturation or mixing colors) will entail “muddying up” and, as a result, will lead to the distortion of originally “pure” colors. Overdoing this might mean losing your viewers, who will find it harder to find your images “believable”. How does one avoid distorting colors so much that they make people cringe or at least doubt your honesty? The answer is both simple and complicated. The complicated part comes in realizing that the “life-like” feel of an image does not come from the “honest” representation of real colors, but rather from a credibility of color combinations within the picture. People want to see what seems pretty, even if it isn’t really all that pretty in the real life. The simple part is learning how to “trick” (in a good way) your viewers into believing you.
The solution is to include monochrome (colorless) areas in your image so that an eye had some place to rest. I call this trick “benchmarking with neutrals”. Benchmarking is a good metaphor because these areas will be used as a reference point to compare other colors against: if a viewer sees solid, believable neutrals (black, grey, white colors), they will find it easier to trust other hues, which will seem much more plausible. To reinforce the effect, you might want to benchmark shades, half-lights and highlights with neutral tones. Let’s take our yellow-tinted palette from the previous chapter (Figure 10.7) and paste it into the neutral gradient (Figure 11.1). Even this abstract experiment shows the effect the background has on colors: they look more attuned to each other, and the yellow tint is barely noticeable.

Figure 11.1. Even this abstract experiment shows the effect the background has on colors: they look more attuned to each other, and the yellow tint is barely noticeable.
Now let’s turn to a real example of a photograph with made up colors, a 1936 advertising made by an American photographer Nicholas Muray (Figure 11.2). The technology behind this picture, tri-chrome carbro printing, relies heavily on the artistic interpretation of colors and involves layered exposure of a color-separated negative to arbitrarily selected pigments. In other words, the colors in the picture in Figure 11.2 are completely made up.
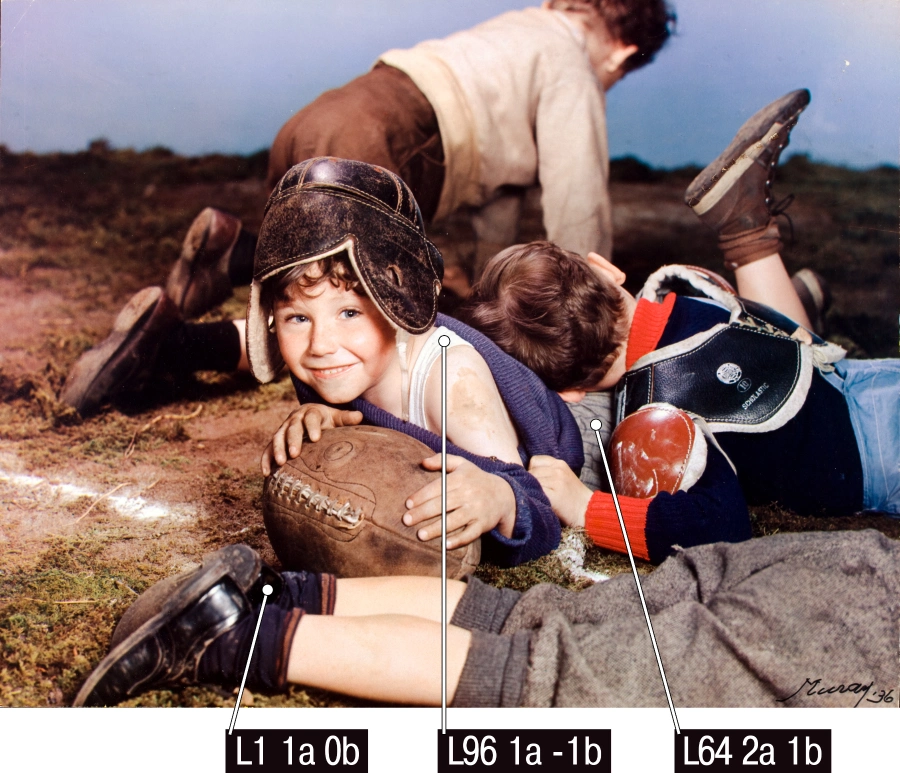
Nicholas Muray, Cream of Wheat advertisement. 1936
At best, the photographer worked from his memory when he was developing this image. Yet a rare viewer will find this chromatic solution unrealistic. We have no way of checking whether the colors in reality were similar to those that we see in the picture, but we are willing to assume that this is exactly how they might have looked like. I can assure you, however, that they were quite different. How do I know? Well, it’s advertising photography. Its aim is not to “sell” the reality as is, but, rather, as you wish to see it. Moreover, as we already know, the technology used to create this image does not involve any color rendering other than that determined by the choice of the printer. Theoretically, the printer might have had accurate reproduction (a snapshot of reality) in mind, but it certainly wasn’t a priority, and trying to achieve this aim could have complicated the technical side of things.
So how come we are so willing to suspend our disbelief for this particular image, where, as we know, the colors are most definitely different from the source? First of all, this is a tastefully rendered picture. Not unlike the artists who develop their palettes for certain paintings, Nicholas Muray “painted” this photograph with his own, carefully selected colors. Secondly, the accuracy, with which the photographer rendered the colors on the faces, plays a big role in shaping our perception of the image. When judging the “truthfulness” of skin tones, we are more likely to concentrate on the faces, and the colors on children’s faces in this image look natural, healthy and quite pleasant overall. Yet another component of our perception, apart from evaluating the harmony of the entire palette (whether it looks realistic or not), is comparing the colors against a number of familiar “checkpoints”, which, in many cases, are numerous achromatic neutrals – grey, white and black areas of an image. Again, it is not important whether these had been colorless when the image had been taken. They could have been – and this is all that matters.
The shoes are almost black, the shorts are almost grey, and the shirts are almost white: all of that is very believable, and this is exactly how the viewer perceives these colors. To demonstrate the influence of neutral benchmarks on our perception I have chosen an Alfred Palmer photograph. The picture was taken in June 1942 during the US government campaign using Kodachrome 64 film (Figure 11.3 [a]).

Figure 11.3 [a]. Alfred Palmer, 1942
I have mentioned the name of the legendary Kodakchrome film on purpose; I will go into details later, but this film was infamous for color distortion. This, coupled with professionally staged lighting and carefully applied make up gives us the right to call the colors in this photograph artificially produced. Nevertheless, they look quite natural. Firstly, because of the accurate representation of skin tones. Secondly, because of the neutral benchmarks, the subject of our discussion. To prove this point, let’s change the color of the girl’s white collar into something equally likely and true to the palette of this picture – say, a warm hue, like a shade of orange or yellow. In order to do this without disturbing other colors I will have to use a mask layer. I will also need to leave the other neutrals (grey and black) intact. Altering even one neutral benchmark (white collar) will make a difference, changing the semi-dark and dark neutrals too will further distort the image.
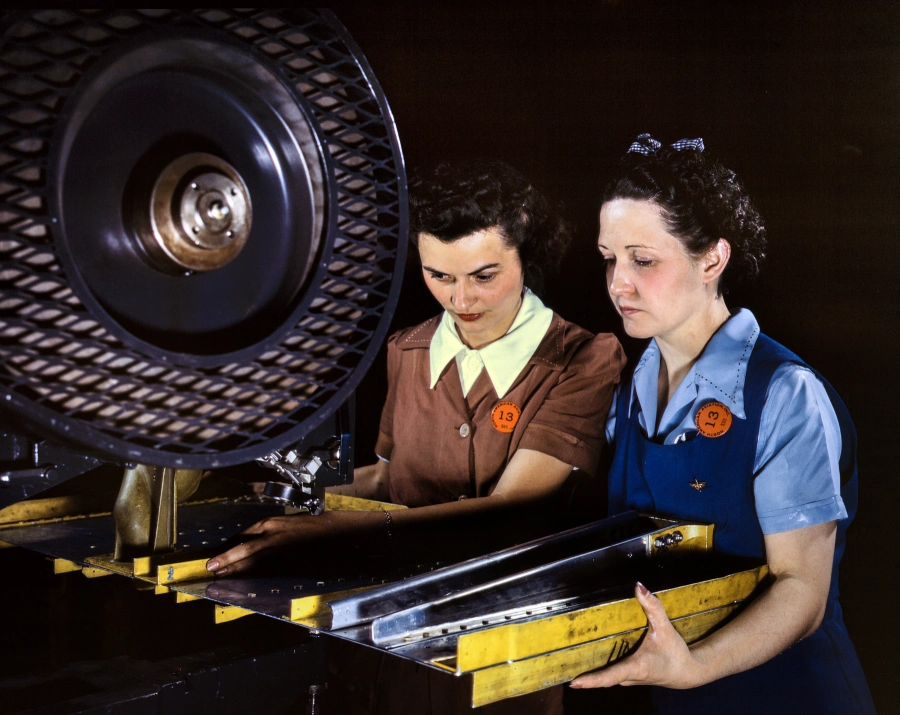
Figure 11.3 [b]. Alfred Palmer, 1942
Even the cursory glance at the resulting image (Figure 11.3 [b]) makes you want to get rid of the yellowish tint that seems to cover the entire picture. It also makes the color palette less believable and stands in the way of you “trusting” the photograph. The original image, on the other hand (Figure 11.3 [a]) looks much more natural in comparison, although we know that its colors do not reflect the reality either.
Do these examples mean that we need to manually introduce neutral benchmarks into all photographs after we have “muddied” them up? Not necessarily. It may be a good trick, but you should use it sparingly – for a number of reasons.
First of all, you don’t always need to rely on neutrals to make your colors plausible. Plausibility, after all, is a practical solution, which sometimes goes against artistic choice (I am not implying, however, that all creative photographs will always contain unrealistic color palettes). Secondly, you need to remember that any selective treatment may distort the perceived integrity of an image. It will introduce an invisible but nonetheless quite real flaw that might be quite difficult to remove if you don’t have enough visual experience and photographic taste. In my work, I try to avoid selective color correction if I can (yet I do use layer masks if I feel I can’t pull the image off without them). Thirdly, you need to plan for neutral benchmarks – provided they are really necessary – on the earliest stages of creating your image: that is, during the photo-shoot and RAW conversion. You must carefully stage the light and set up the white balance in your camera or RAW converter. If you want to have a white collar, for instance, you must make sure it is white in the studio – to save the effort later on. It is also helpful to keep in mind that it is not difficult to set up a “zero” color balance for one area of an image. But doing that with several different areas (for example, getting a white collar, neutrally-grey steel and black shadows at the same time) is a much more difficult task. The more work you do during the photo-shoot, the fewer problems you will have in conversion and post-processing.
Generally, I do not exclude either selective color correction or using single channel curves for “neutralizing” benchmark areas – if you decide you need to have them at all. In this case, one interesting question is which parts of an image should be made neutral: the ones that we perceive as neutral in real life or some randomly selected abstract black, grey and white points? Predictable colors are, of course, important for human visual perception. Whatever creative idea your image might convey, we normally expect (there are exceptions, too) a clean shirt collar to be white, as opposed to yellow, blue or any other color. It doesn’t have to be white in the picture, though, and we can set up benchmark neutrals in other areas of the image. Moreover, it doesn’t matter what color the collar is in reality – with normal lighting, a viewer will see it as white and will better react to the surrounding image. On the other hand, if you aim for a disco-lights effect, you can expect the collar to reflect all colors but white. In this situation, the benchmarks will move to some abstract zones that may or may not be normally neutral in color.
When looking at a photograph it is often sufficient to spot some white, black and grey points – these will trick your mind into “believing” that the image does not have unrealistic hues. To give an example, let’s look at a different Kodachrome photograph, this time from Alex Webb (Figure 11.4). Like many other Magnum-affiliated photographers, Webb prefers using this particular film exactly because it distorts colors in such an attractive way. At the same time, the picture looks quite realistic in its chromatic scheme. Mostly because it boosts a large area of black shadow and a couple of very light, almost white, spots. These neutral areas are quite randomly selected: the shadows could have been, for instance, brownish or with a colder tint to them, and the highlights are really abstract and are hardly linked to any “meaningful” objects whatsoever.
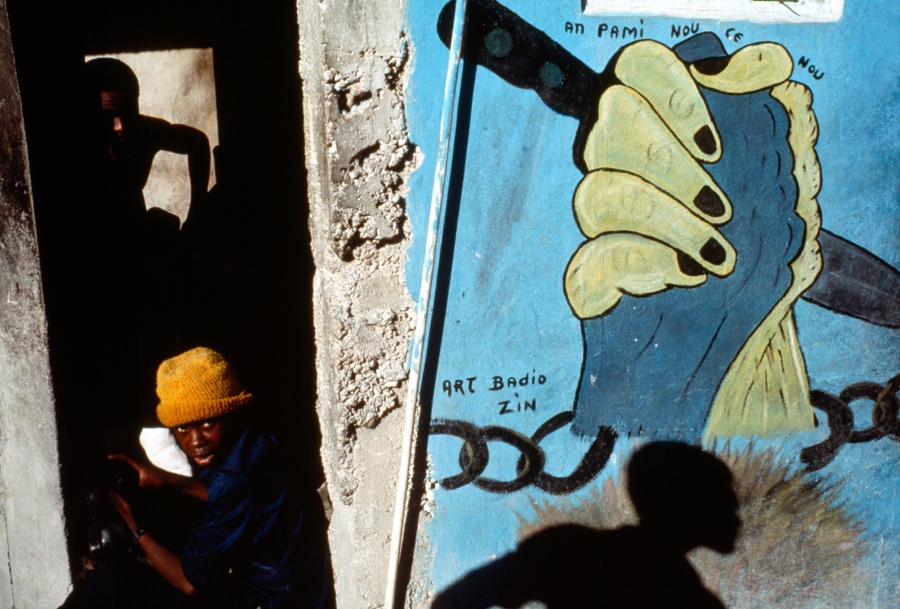
Figure 11.4. Alex Webb
You don’t have to always rely on neutral benchmarks. In many cases expressive chromatic solutions do not require such referencing. Moreover, they can be deliberately shifted to a certain, very apparent hue. For instance, looking at this photograph by David Allan Harvey (Figure 11.5) we would be hard pressed to even suggest the areas to “decolorize”.
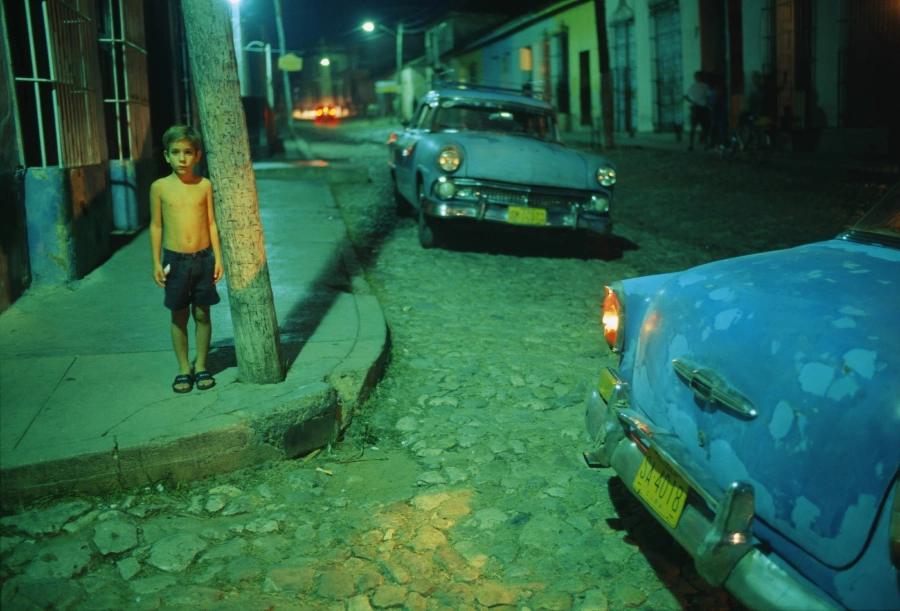
Figure 11.5. David Allan Harvey
The reason for such an unusual color display is probably the street lamps emitting light of different temperatures. Thanks to them, the entire scene has an otherworldly feel to it, and its subject – the boy – looks almost alien-like. The photograph itself is very expressive; and although the color palette may raise some eyebrows, few people would argue that the hues do not harmonize or that the author did not know what he was doing.
Despite the efficiency of neutral benchmarks, the real approval of the viewer lies in the harmony of colors. Trust here is secondary to creativity and artistic expression. If a photograph looks beautiful, the viewer will not mind “unrealistic” colors: in fact, they will hardly spend any time thinking whether the colors might have looked like that in real life. Yet if the harmony is missing, no amount of benchmarking will help us make the colors look well together or, in fact, be trustworthy. At the same time, as we have seen, neutral benchmarks can prove quite useful in working with colors.
LIFELIKE: A book on color in digital photography
