

DaVinci Resolve is not just a video editing software but one of the best color grading solutions at the moment and, moreover, one of the commonly accepted standards in the whole industry. It is also well known that production has evolved considerably further in comparison with photography – both technically and aesthetically.
Therefore, photographers often tend to peek at professional colorists, and it’s quite understandable. At least it broadens the horizons and helps them to borrow the same powerful, high-quality and comprehensible tools and approaches. We’ll try to give you a hand with that.
What’s the point?
DaVinci Resolve is a far more sophisticated color grading toolset compared to Adobe Photoshop or Lightroom. Just look at color wheels, variety of properly working curves, waveforms, bunch of color transformation tools, extended node trees instead of simple and linear layer sets. Don’t forget about floating point processing that produces technically better results.
However, DaVinci is a video grading software, not a dedicated photo editor. Therefore, with all its benefits there are some drawbacks: limited RAW support, no conventional crop tools and inconvenient workflow with vertical photos.
While DaVinci accepts photos of any size, timeline and output file dimensions are limited to a maximum of Ultra HD 4K (3840 x 2160 px) in the free version. There are also other limitations out of photo processing context.
Step by step beginners guide
We assume that if you are reading this article, it is likely that you are not yet familiar with DaVinci Resolve. Otherwise you don’t need any special knowledge to process photos since, in fact, it’s just a particular case of video processing.
However, one article can’t cover all the endless possibilities and workflows of DaVinci. It’s a powerful and rich toolset, unconventional for photographers in many aspects. So this publication is limited to the basic principles of photo editing.
Our main goal is to teach you the basic workflow from import trough export. Image correction methods and tools require separate deep study (there is a bunch of free tutorials and paid classes available).
Well, let’s start:
1. Download DaVinci Resolve from official site and install it

Please remember that DaVinci free version is limited to a maximum of Ultra HD 4K (3840 x 2160 px) resolution on timeline and export. If you need higher resolutions – there is single payment option to get full ‘Studio’ version for $299 (which, however, isn’t that much compared to Adobe Photoshop subscription for several years).
2. Launch DaVinci Resolve.
Then Project Manager appears. Create New Project hitting corresponding button and give it a name.
3. Add files you want to process

Go to Media tab at the bottom of the main DaVinci window. In the Media Storage section (upper left) find your photos folder. It’s more convenient to pick files for processing in advance, then put them all in a single folder. JPEG, TIFF and DNG file formats could be processed, along with some particular camera RAWs.
For more information about RAW workflow – see the end of the article.
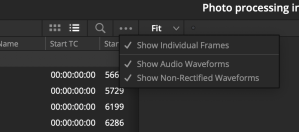
Then select checkbox Show Individual Frames in the Media Storage settings to see the full file list without merging images to sequences.
Select files and drag them to the Master frame (the biggest one).

4. Go to Edit tab at the bottom

5. Set Clip duration
From the DaVinci aspect, static images are individual frames that are assembled into video clips on a timeline. There will be a static 5 sec clip added to the timeline when you drag a photo, by default. But for our specific needs 1 frame clip would be better (otherwise we’ll get extra copies of the same picture on export).
To do this open DaVinci Resolve menu — Preferences. Go to User section and select Editing on the left. In General Settings set Standard Still Duration as ‘Frames: 1’.

6. Color Settings
If you are working on Mac checking Use Mac Display Color Profiles for Viewers (General section) makes color rendering more precise – usually but not always. It depends on display calibration quality and some other DaVinci settings.

As a starting point we recommend to try both variants an to choose the setting that makes images inside DaVinci match better with the exported ones.
If you need more accurate color reproduction with DaVinci in the future, we recommend a professional consultation and calibration service. For example, Alexander Prokhorushkin and his ICG Cal.
You can also check the article Setting DaVinci Resolve (Studio) for color correction by Ilya Malykh (in Russian).
7. Add photos to the timeline
Select desired photos in Media Pool (upper left) and drag them to the timeline (bottom center).

As we earlier set default clip duration to 1 frame, our photos will appear as thin lines (very short clips). But timeline could be scaled up and down using Cmd (Ctrl) +/- hotkeys.

8. Go to Color tab at the bottom

9. Setting aspect ratio
Default timeline size is Full HD 1920×1080 px. But photos usually have another aspect ratio (not 16:9) and black bars at the sides will be visible. Timeline dimensions must be set to match ratio and properly fit the whole image into the frame.
Today we are experimenting with Fuji X-T3 JPEG files measuring 6240×4160 px. This is a typical 3:2 aspect ratio. Free version of DaVinci Resolve is limited to the maximum of 3840×2160 px. Simple calculation gives an optimum size of 3240×2160 px to fully fit this image into view. Let’s change Project Settings accordingly (hit the ‘gear’ icon in lower right corner).

Here are the maximum pixel dimensions for some typical aspect ratios:
3:2 – 3240×2160
4:3 – 2880×2160
1:1 – 2160×2160
10. Add Dehancer Pro OFX plugin to the processing chain (special version for photographers Dehancer Photo Edition can be used too).
This could be a long bookshelf for countless DaVinci color grading manuals.
But our processing example is based on Dehancer Pro OFX plugin, which can be downloaded and installed in advance (don’t forget to restart DaVinci). You can also install the Dehancer Photo Edition version, designed specifically for photographers and limited to one frame per clip export without watermark – thus allowing full photo processing but useless for video.
You can also edit photos in DaVinci by many different ways and methods, even without plugins. It depends on what special results you want to get and how fast.
Processing chain in DaVinci is determined by nodes. Nodes are the main structural element in this sequence, a kind of ‘box’ where some image transformation is taking place. Each node has parameters controlling its effect.
Nodes workspace can be found at the right of the main view. There is always one color correction node added to all clips by default. This is where you can spin the famous color wheels and use other basic correction tools (bottom left). But if you want to get really interesting results, you’ll probably need advanced tools. One of the best tools with film profiles and additional film effects is Dehancer Pro (or the simplified version Dehancer Film).
Go to Open FX section (upper right), scroll down to find Dehancer Pro (or Dehancer Photo Edition) you just installed and drag it over the link so that it would stand in the sequence behind the first one, as shown on the picture:

There are different ways of adding nodes but this is the simplest one.
11. Image adjustment
Advanced description of all plugin tools and options is a topic for a separate article. But in general all settings are rather intuitive and their impact is clearly visible. There are many film profiles to choose from, followed by film and print parameters like exposure, push/pull, contrast, saturation, analogue range limiter, expand and others.
Along with plugin parameters you can tweak image within the first (previous) color correction node. White balance, shadows/highlights, curves and other tools are located there. Waveform (lower right) is very convenient for technical image control.
Perhaps at a more advanced level you’ll also need one more node to convert input sRGB color space to Rec.709 (standard for video), but in fact that’s not really necessary – just keep looking at the image and use the waveform properly.
You may also add other built-in DaVinci nodes or other plugins to the chain, crop and rotate the image and add many other effects.

Note:
For your convenience you can hide all unused tools and enlarge Main View to the whole DaVinci window, leaving only current node parameters visible – just hit Shift+F.
12. Correcting other images
Select next image ‘clip’ (Up and Down arrows also can be used for this) and make necessary adjustments. Repeat this for all clips on the timeline.
If a series of photos is processed it is practical to transfer parameters from previous clip to the next one.
There are several ways to do this. The simplest one is to use ‘memory slots’. Select the source photo clip and press ALT+1 to copy settings to the memory slot 1. Then go to the next clip and press CMD+1 to paste settings. Then use pasted settings as a starting point for further fine-tuning.
There are 8 independent memory slots, accessible with ALT (Option) and CMD keys, followed by the numbers from 1 to 8. A good idea is to use them as temporary ‘presets’.
With proper skill this is a confident and quick way to process fairly big batches of photos (and most importantly, to maintain a consistent overall style of the series).

13. Exporting files
When everything is set for all photos (clips), then go to Deliver tab at the bottom.
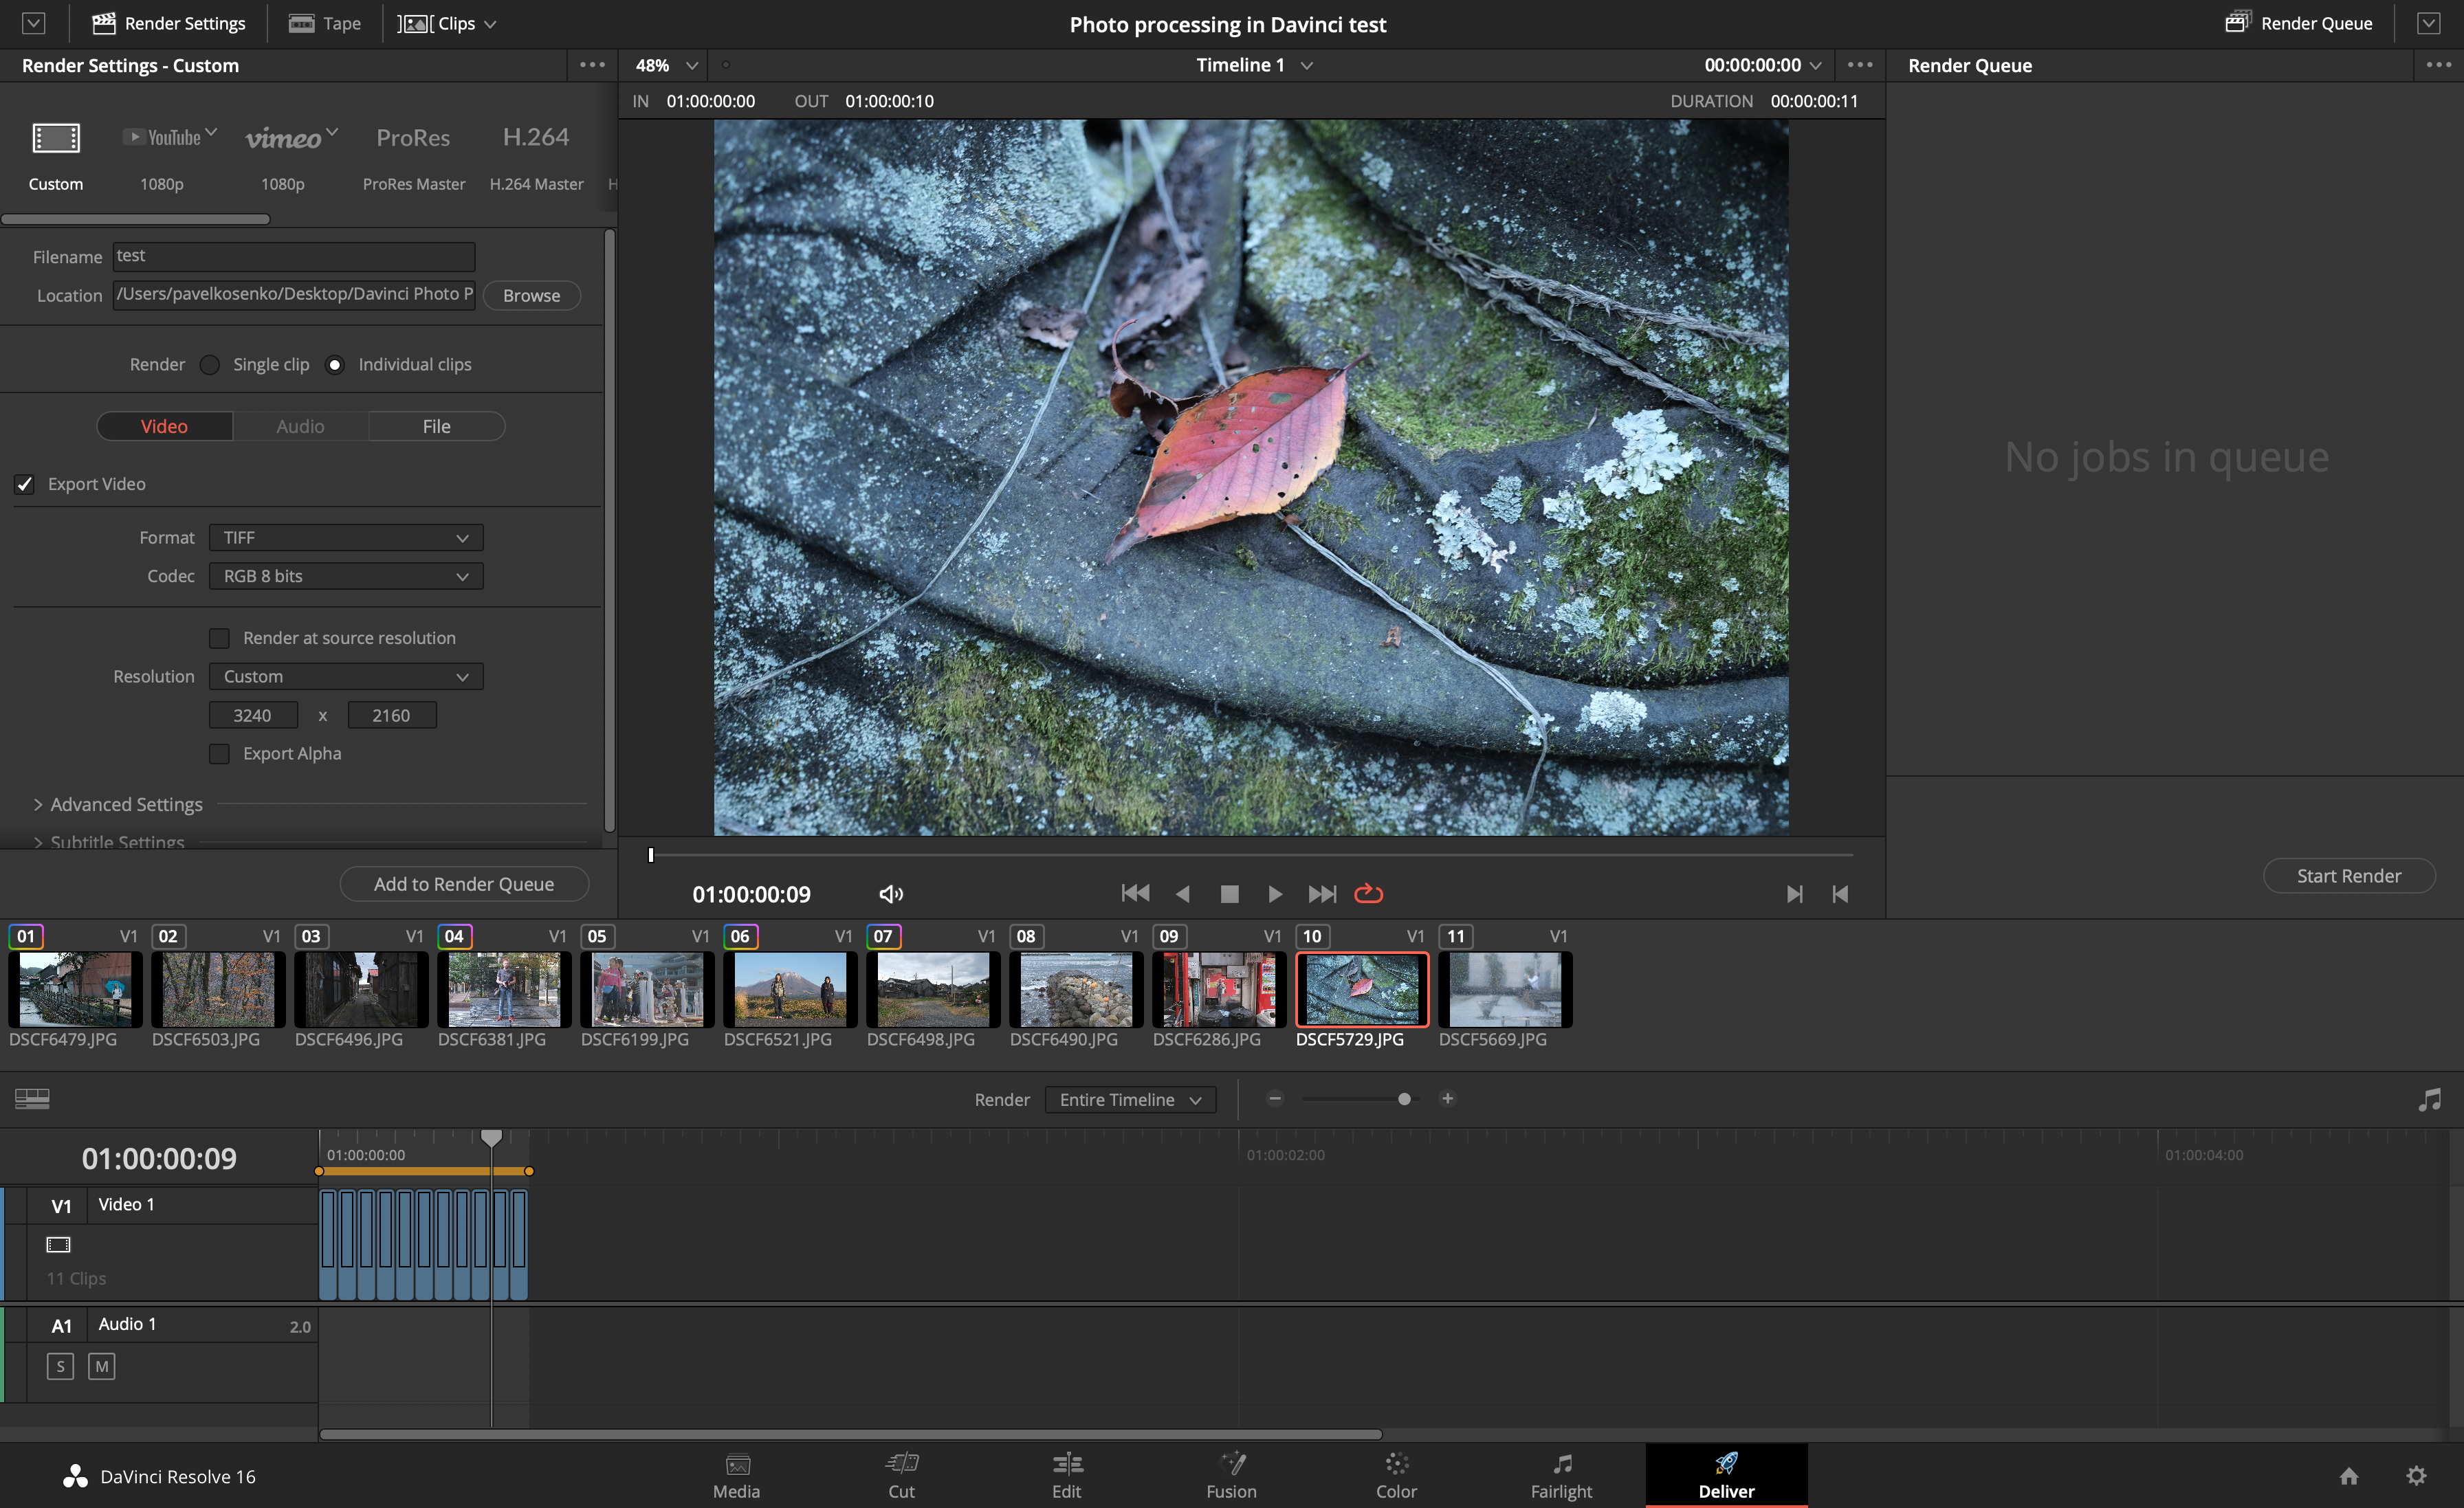
Specify the name of the group of files and the path to the folder where they will be saved. Select “Render: Individual Clips“. In the Export Video section select TIFF format (you can also select DPX or JPEG2000).
In the File tab check Use unique filenames. There you can also choose the file naming template or leave the default values.

Press Add Render Queue button.

Then press Start Render.
13. Enjoy the process.
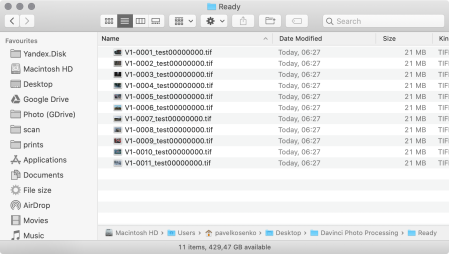
After rendering is done all photos will be saved in the specified folder.
Voila!
Working with RAW photos
Most modern cameras produce good enough JPEGs for further processing with DaVinci – but under two important conditions:
1. Camera dynamic range is used effectively when shooting, e.i. the shot is exposed without critical detail loss in shadows and highlights.
2. White balance does not deviate too much from ‘normal’ for given subject.
RAW contains much more information and may be worthwhile if the photo was taken under difficult conditions or with exposure and white balance errors. RAW also typically produces better results on cameras with aggressive JPEG processing (typical for smartphones).
Many photo RAW formats are supported natively in DaVinci. First of all it’s the commonly used DNG format and some others. Unfortunately, DaVinci developers do not publish a full list of supported cameras, so compatibility check is up to you. If you can’t drag RAWs to Project Bin and then to the timeline as it is (like with JPEG or TIFF), probably this particular RAW format isn’t supported natively.
No problem! The problem is solved by converting RAWs to DNG format – with the help of free Adobe DNG Converter utility:
https://helpx.adobe.com/photoshop/using/adobe-dng-converter.html
1. Download, install and run the utility.

2. Check the settings (Change Preferences button), they should appear as stated below:

3. On the main utility screen choose the input folder with your source RAWs, then select output folder for converted DNGs and hit Convert button. You photos will be processed to DNGs, compatible with DaVinci.
Camera Raw settings
Drag photos to the timeline. In the Color tab you will find a new section called Camera Raw (red outline on the screenshot below):


First column contains input parameters:
– Decode Quality
Defines maximum input resolution of RAW processing. Best setting is Full Res, unless your files are really huge.
– Decode Using
This defines whether to use common or individual settings for every clip. Better use Clip when working with photos.
– White Balance
Select from different WB presets.
– Color Space
This is a ‘working color’ space and it should follow the project settings, by default it’s Rec.709.
– Gamma
Usually Gamma (contrast curve) for photo processing must be set to sRGB.
The second and third columns contain typical image parameters, well known from any ‘normal’ RAW converter. They don’t need a separate description – just use them carefully and tastefully.
We noticed that in some cases DaVinci may misinterpret saturation in RAW, so if photo appears obviously discolored, you may need to add Saturation.
Read more about how Dehancer Film works in other articles.
Download actual Dehancer Film version:
https://www.dehancer.com
For a 2-week Promo license, please request to [email protected].
Authors:
© Pavel Kosenko
© Dmitry Novak
© Denis Svinarchuk