
- SYSTEM REQUIREMENTS AND PERFORMANCE TIPS
- DEHANCER INSTALLATION AND FIRST LAUNCH
2.1. Dehancer Ps/LrC/C1
2.2. Check compatibility
2.3. Download Dehancer
2.4. Make sure that DaVinci is not running
2.5. Plugin Installation
2.6. First launch and Profiles Download - DEHANCER PLUGIN AND PROFILES UPDATE
3.1 Plugin Update
3.2 Profiles Update
3.3 Plugin Updates VS project compatibility - LIMITATIONS OF THE ‘FREE’ VERSION
- LICENSE FEATURES AND COMPATIBILITY
5.1. Why should I buy a License?
5.2. What are the Seats?
5.3. License compatibility between different products
5.4. License compatibility between different OS
5.5. License compatibility between different host applications
5.6. Is it possible to Upgrade the License? - HOW TO BUY AND ACTIVATE THE LICENSE?
- LICENSE UPGRADE
- TRANSFERRING LICENSE TO ANOTHER ACCOUNT
- PAYMENT ISSUES. HOW TO GET THE INVOICE?
- TECHNICAL ISSUES
- TRANSPARENCY (CLIP ALPHA) AND NODE MASKS
- HOW TO UNINSTALL DEHANCER PLUGIN?
- Ps/LrC/C1 APPLICATION PATH AND USER DATA LOCATION
- PREVIOUS VERSIONS OF DEHANCER PLUGIN DISTRIBUTIVES
- DEHANCER DESKTOP APPLICATION
1.SYSTEM REQUIREMENTS AND PERFORMANCE TIPS
2. DEHANCER INSTALLATION AND FIRST LAUNCH
2.1 For Dehancer Ps/LrC/C1 plugins Installation & Setup please check our detailed PDF manuals:
https://www.dehancer.com/help/installation_setup
2.2 Check compatibility
Make sure you have a compatible Mac released from middle 2012 with MacOS Mojave or later installed and updated. See pt. 1 and 2.
2.3 Download Dehancer
Please visit the Downloads & Buy section of dehancer.com website. Choose the product, then hit Download button.
2.4 Make sure that DaVinci is not running
Please, keep DaVinci closed until installation is complete.
2.5 Plugin Installation
Run the Intel or M1 installation file (double-click the corresponding *.app file).
Follow the installer instructions and enter you system password if needed (it is absolutely safe).
2.6 First launch and Profiles Download
- Start DaVinci Resolve after the installation is complete.
- Go to DaVinci settings and make sure Metal option is available and switched on.
- Find ‘Dehancer’ at the bottom of the ‘OpenFX / Film Emulation’ section.
- Drag ‘Dehancer’ as a separate node to your clip.
- Click ‘Download profiles’ button in the plugin. Wait until the update is complete, then click ‘Ok’ button in the downloader window.
- Enjoy.
3. DEHANCER PLUGIN AND PROFILES UPDATE
We update the plugin regularly, adding new features, fixing bugs and improving performance. We also add new film and camera profiles. Keep Dehancer up-to-date to get the most out of it.
3.1. Plugin Update
Please, check the actual product version at the main page of dehancer.com website. If the new version is out, download and install it manually (see pt. 2).
3.2. Profiles Update
To update Film and Camera Profiles, please use the ‘Check Update’ button within the plugin interface.
Please note that the Profiles Update doesn’t update the plugin itself.
If the new Dehancer version is out, download and install it manually.
3.3. Plugin Updates VS project compatibility
Generally, with minor updates, Dehancer settings in existing projects are not affected, but this depends on many factors, including DaVinci version, operating system and the entire processing chain.
If the upcoming Dehancer update does not technically allow to maintain settings compatibility, new version will be automatically installed as a separate, independent plugin.
However, we recommend that you avoid updating both the plugin itself and DaVinci Resolve until you are finished working on the important projects.
4. LIMITATIONS OF THE ‘FREE’ VERSION
You can download, install and run any Dehancer product for free.
The plugin is fully functional, including all tools, all profiles and future updates.
The only limitation when working without a License Key is the watermark logo, superimposed over the image preview and rendered clip.
To remove the watermark once and for all, please buy and activate the License.
5. LICENSE FEATURES AND COMPATIBILITY
5.1. Why should I buy a License?
Product Activation removes watermark logo forever (except for the Promo License limited to 2-weeks). You need a valid License to activate Dehancer.
5.2. What are the Seats?
Each License includes two Activation Keys for two seats (workstations) that can be activated and deactivated independently.
5.3. License compatibility between different products
Each product has its own License. For example, Dehancer Grain plugin can be activated only with the proprietary Activation Key. The Key for Dehancer Pro will not work (although the Grain tool is included in Dehancer Pro).
5.4. License compatibility between different OS
Each Activation Key can be used independently on any operating system for which this Dehancer product exists.
5.5.License compatibility between different host applications
Each Key is suitable only for the certain host application.
For example, if you already own a Dehancer plugin for DaVinci, you can’t use this License for upcoming Final Cut Pro Dehancer plugin activation.
Attention!
Dehancer Photo plugin for Ps / LrC / C1 includes two separate installations – for Adobe Photoshop and for LrC / C1.
Both installations share the same Activation Key.
5.6. Is it possible to Upgrade the License?
Yes, you can upgrade any valid Lifetime License to any more expensive one, within the same host application, whenever you like.
More information is available in the LICENSE UPGRADE section.
6. HOW TO BUY AND ACTIVATE THE LICENSE?
To remove the watermark logo you need to purchase a License and activate the plugin with the supplied Activation Key.
Each product has its own License. For example, Dehancer Grain can be activated only with the License intended for this product – the License from Dehancer Pro will not work, although the Grain tool is part of Dehancer Pro.
- Please visit the Downloads & Buy section of dehancer.com website. Choose the right product, then hit the ‘Add to Cart’ button.
- Review the Checkout page and change the quantity if needed. Note that we provide several ‘seats’ with each License.
- Input the Promo Code if you have one and proceed to the payment.
- After your payment is accepted, you will receive an email with Activation Keys (one for each seat). Also, you will find the new License appeared in the License Management section of User Profile.
- To activate Dehancer press the ‘License Info’ button in the plugin interface. In the activation widget there are two options available:
’Login and select License’ – login with your Dehancer account, choose a Seat from the list of available Licenses, press [Select] and [Activate].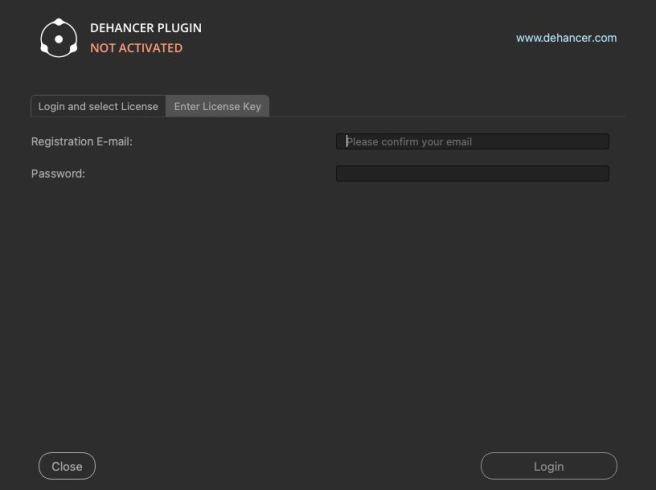 ‘Enter License Key’ – paste your e-mail and Activation Key from the letter you’ve received after purchasing to the corresponding fields and press [Activate].
* Internet connection is needed for Activation.
** Activation via Login doesn’t work with Beta Licenses
*** Please don’t forget to Deactivate from within the plugin interface BEFORE migrating your computer or reinstalling the System.
7. LICENSE UPGRADE
You can upgrade any valid Lifetime License to a more expensive one, whenever you like. You only pay the difference between the price of your License and the price of the License you are upgrading to, based on prices at the date of the upgrade.
To upgrade your Dehancer product:
- Deactivate your current License Key inside the plugin.
- Login to dehancer.com and go to License Management section of User Profile, find the License you wish to upgrade, then click ‘Upgrade License’ button.
- In the checkout page, select the product you intend to upgrade to. Here you can apply a promo code if you have one.
- Proceed to payment as usual.
- After the payment is accepted, you’ll get the e-mail with your new Activation Key, and the new License will appear in your User Profile. Old License will be revoked.
- Download and install your new plugin from Downloads & Buy section.
- Activate the plugin as usual with your new Activation Key.
8. TRANSFERRING LICENSE TO ANOTHER ACCOUNT
If you need to transfer a License you own to another user account, follow these steps:
1. Log in to dehancer.com and go to User profile, License Management section.
2. Find the right License and click Transfer License button.
3. Enter the target account email, click Continue, review all the details and hit Transfer.
4. Selected License will be deactivated and revoked from your account. New Activation Key will be issued and sent to the target account email.
5. When the operation is complete, you will see a confirmation message.
Please note:
-You completely hand over control of the License to another account. All your seats will be deactivated.
-Any aspects of buying and selling licenses on the aftermarket are beyond Dehancer’s responsibility.
9. PAYMENT ISSUES. HOW TO GET THE INVOICE?
Your ordinary receipt is sent automatically after the payment is accepted.
If you need the Pro Forma Invoice, please let us know: [email protected]
10. TECHNICAL ISSUES
Please complete this checklist before requesting support:
- Make sure that you have the latest version of Dehancer plugin installed. Please visit the Downloads & Buy section and update if needed.
- Check your version of DaVinci Resolve. 16.2 is generally considered a stable release, where some bugs from previous versions have been fixed.
- Intel Iris and Intel HD Graphics GPUs are not supported.
If you still encounter any bugs with Dehancer, send bugreport to [email protected]
Please provide the following information:
- Detailed error description.
- DaVinci and Dehancer versions.
- In DaVinci, go to Help menu and hit Create Diagnostics Log on Desktop. Then attach this log file to the e-mail.
- Also we need several .drx stills from your project along with a short fragment from the source video.
11. TRANSPARENCY (CLIP ALPHA) AND NODE MASKS
At the moment Dehancer doesn’t support alpha channels (including titles) and node masks. Using the plugin with any transparent clips or with node masks may lead to unpredictable results.
For transparent titles and logos try this workaround:
- Create the compound clip containing your titles (or logo) and the solid fill generator underneath (as a background). If your titles are generally lighter than middle grey – use black fill, otherwise use the white fill.
- Apply Dehancer to this opaque compound clip as usual.
- Select the compound clip on the timeline. In the Clip Inspector change Composite mode to Add (for black background) or Multiply (for white background). Now clip background should appear transparent.
12. HOW TO UNINSTALL DEHANCER PLUGIN?
Important information
Please don’t forget to DEACTIVATE YOUR LICENSE before uninstalling any product. Use the ‘License Info’ button inside the plugin, then press ‘Deactivate’ and wait until deactivation is complete.
- The number of License deactivations from within the plugin is unlimited
- License deactivation using your User Account at dehancer.com is limited to 10 times>
Dehancer OFX Plugin (macOS)
- Deactivate the plugin you are going to remove (use ‘License Info’ button inside the plugin, then press ‘Deactivate’).
- Go to /Library/OFX/Plugins/ directory on your Mac.
- Choose plugin you are going to remove.
- Right-click on the plugin and choose Show Package Content.
- Run the maintenancetool.app application.
- Choose Remove All Components, click Continue and follow uninstall steps.
This method works for all versions of Dehancer starting from v4
Dehancer OFX Plugin (Windows)
- Deactivate all your plugins (use ‘License Info’ button inside the plugin, then press ‘Deactivate’).
- Use the regular Windows uninstall procedure:
- Go to Control Panel → Programs → Programs and Features
- Press and hold (or right-click) on the plugin you want to remove and select Uninstall or Uninstall/Change
Attention!
Using the built-in Windows Uninstaller for Dehancer versions up to 4.1 may lead to unexpected results. Use at own risk.
Dehancer Plugin for Adobe Photoshop (macOS)
- Deactivate the plugin (use ‘License Info’ button in the plugin Settings, then press ‘Deactivate’).
- Go to /Library/Application Support/Adobe/Plug-Ins/CC/Dehancer/ directory on your Mac.
- Run the maintenancetool.app application.
- Choose Remove All Components, click Continue and follow uninstall steps.
Dehancer Plugin for Adobe Photoshop (Windows)
- Deactivate the plugin (use ‘License Info’ button in the plugin Settings, then press ‘Deactivate’).
- Go to C:\Program Files\Common Files\Adobe\Plug-Ins\CC\Dehancer directory on your PC.
- Run the maintenancetool.exe application.
- Choose Remove All Components, click Continue and follow uninstall steps.
Dehancer Plugin for Lightroom & Capture One (macOS)
- Deactivate the plugin (use ‘License Info’ button in the plugin Settings, then press ‘Deactivate’).
- Go to /Applications/Dehancer Lightroom Plugin/ directory on your Mac.
- Run the maintenancetool.exe application.
- Choose Remove All Components, click Continue and follow uninstall steps.
Dehancer Plugin for Lightroom & Capture One (Windows)
- Deactivate the plugin (use ‘License Info’ button in the plugin Settings, then press ‘Deactivate’).
- Go to C:\Program Files\Dehancer Lightroom Plugin\ directory on your PC.
- Run the maintenancetool.exe application.
- Choose Remove All Components, click Continue and follow uninstall steps.
13. Ps/LrC/C1 APPLICATION PATH AND USER DATA LOCATION
Below you can find the main system paths of the installed application components and user data locations, which you may need when contacting support or maintaining the plug-in.
INSTALLATION (macOS)
- Adobe Photoshop plugin: /Library/Application Support/Adobe/Plug-Ins/CC/Dehancer
- Adobe Lightroom and Capture One plugin: /Applications/Dehancer Lightroom Plugin/Dehancer Lightroom Plugin.app
USER DATA (macOS)
- Shared folder: /Users/{user}/Library/Application Support/com.dehancer.film_shared
- User Presets folder: /Users/{user}/Library/Application Support/com.dehancer.film_shared/presets
- Adobe Photoshop plugin log: /Users/{user}/Library/Application Support/com.dehancer.film_shared/dehancer_logs/photoshop_plugin.log
- Adobe Lightroom and Capture One plugin log: /Users/{user}/Library/Application Support/com.dehancer.film_shared/dehancer_logs/lightroom_plugin.log
- Standalone application log: /Users/{user}/Library/Application Support/com.dehancer.film_shared/dehancer_logs/dehancer_pro.log
INSTALLATION (Windows)
- Adobe Photoshop plugin: C:\Program Files\Common Files\Adobe\Plug-Ins\CC\Dehancer
- Adobe Lightroom and Capture One plugin: C:\Program Files\Dehancer Lightroom Plugin\Dehancer Lightroom.exe
USER DATA (Windows)
- Shared folder: C:\Users\{user}\AppData\Local\dehancer\com.dehancer.film_shared
- User Presets folder: C:\Users\{user}\AppData\Local\dehancer\com.dehancer.film_shared/presets
- Adobe Photoshop plugin log: C:\Users\{user}\AppData\Local\dehancer\com.dehancer.film_shared/dehancer_logs/photoshop_plugin.log
- Adobe Lightroom and Capture One plugin log: C:\Users\{user}\AppData\Local\dehancer\com.dehancer.film_shared/dehancer_logs/lightroom_plugin.log
- Standalone application log: C:\Users\{user}\AppData\Local\dehancer\com.dehancer.film_shared/dehancer_logs/dehancer_pro.log
14. PREVIOUS VERSIONS OF DEHANCER PLUGIN DISTRIBUTIVES
Sometimes you may need to access old projects graded with previous versions of Dehancer. To make plugin settings compatible with an old project you have to install the exact version of Dehancer.
All Dehancer distributives are available here:
OFX Plugins for DaVinci Resolve
https://update.dehancer.com/downloads/macos/davinci_resolve/legacy/
https://update.dehancer.com/downloads/windows/davinci_resolve/legacy/
https://update.dehancer.com/downloads/linux/davinci_resolve/legacy/
Dehancer Film for Adobe Photoshop / Lightroom / Capture One / Affinity
https://update.dehancer.com/downloads/macos/pslr/legacy/
https://update.dehancer.com/downloads/windows/pslr/legacy/
Dehancer Film for Adobe Premiere
https://update.dehancer.com/downloads/macos/aepr/legacy/
https://update.dehancer.com/downloads/windows/aepr/legacy/
Dehancer Film for Final Cut Pro
https://update.dehancer.com/downloads/macos/final_cut/legacy/
Select the one you need, install, enjoy!
15. DEHANCER DESKTOP APPLICATION
There was an obsolete application called ‘Dehancer Desktop pre-alpha’. It is no longer supported, nor available for download and beta testing anymore.
Dehancer Photo plugin for Adobe Photoshop, Lightroom Classic and Capture One Pro is available now: https://www.dehancer.com/store/photo/pslr
The Lightroom Classic plugin can also be used as a standalone external editor. Use the Open In… menu option in Finder (macOS) or File Explorer (Windows) and select your installed Lightroom Classic plugin as an application.
