

There are many ways to simulate film grain in digital post-processing. Either way, there are two different methods and types of grain simulation:
- Natural grain scanned from real footages shot on film.
- Procedural (computer generated) grain.
Both approaches have rights to exist and both have their pros and cons. At first glance, scanned grain is the only ‘honest’ way to add grain to digital picture. But no matter how real it is in its origin, this type of grain isn’t related to the image, doesn’t represent it and therefore will always look unnatural and superimposed. Also there is significant limitation in controlling the characteristics of sampled grain – size, texture, density etc.
After many years of movie and photographic film study and many experiments on darkroom printing and film scanning, we managed to create a reliable mathematical 3D model that allows us to generate flexibly controlled analogue-like procedural grain.
This model is based on physical properties of real emulsion. Here are some of them:
- Grain isn’t just overlaid on the image. Image consists of grain. One of the key points (but not the only one) that follows from this is that image detail depends on grain size, and usually visible details do not exceed grain size.
- Film emulsion has a certain thickness, i.e. it is not flat. When passing through multiple layers of emulsion, light is reflected, refracted and diffused in many ways.
- Silver halides (as well as dye granules) have volume. Accordingly, they are turned differently relative to film plane and therefore inevitably cast shadows.
- There are different shapes of granules – classical rounded and flat grain, also called ’T-grain’.
- Silver halides are distributed unevenly in the depth of emulsion layer. Tiny grains do not exist alone, forming complex conglomerations.
- – There is always considerable amount of grain in highlights because these areas correspond to maximum negative density, i.e. maximum accumulation of silver halides (Dmax). These always affect positive image printed from film to film or from film to photo paper. At the same time, due to the nature of human perception, grain is less noticeable in the highlights (but cannot be null).
- Grain is always found in deep shadows too, as these areas correspond to minimum exposure, i.e. minimal amount of silver halides (Dmin, most transparent areas of the negative). Accordingly, when printing from film to film (or from film to paper), print media is getting maximum amount of light in the shadows of the final image. In this way, the grain of print media itself becomes visible, along with slight grain of the source negative film.
Our algorithm generates grain based on local colour and brightness characteristics of the image, and thus is always related with it.

The granules are in fact 3D particles in the volume. Each granule is rotated relative to the image plane by a certain angle. Granules are randomly shifted and sometimes grouping in clusters. The resulting structure of ‘halides’ is superimposed over the original image (not vice versa like with traditional approach), taking into account the reflection, refraction and diffusion effects in the layers of ‘emulsion’.
In the process of printing simulation, the initial negative grain becomes positive and is built into the image as an integral part of it, that is, it does not look like overlaid on top.
On the one hand, procedural grain eliminates the need to use quite large scan files, which should be included in the installer bundle. In this case, tens or even hundreds of high-resolution scans would be required to avoid repeating patterns. And also results in additional tricks – rotation and mirroring for each frame, etc.
On the other hand, grain generation requires computational resources and inevitably slows down the framerate in the viewport and during the rendering process. However, we managed to accommodate these losses to a mere 5% of the plugin’s total performance.
How it works?
Today Dehancer Film has control over six basic parameter of the grain:

- Size. This parameter determines the size of silver halide granules. A higher Size value corresponds to a more photosensitive (and therefore more granular) emulsion.
- Amount. Total amount of grain generated, corresponding to the negative optical density.
- Film Resolution. Please see update in the end of this article.
- Shadows / Midtones / Highlights. Grain distribution between shadows, midtones and highlights.
- Chroma. Grain color contrast (chromaticity). This parameter determines the dye density within the gamut of selected film.
Grain size is automatically corrected based on the geometric size of the image you are working with (project / timeline video dimensions).
Let’s show the influence of grain parameters on a given example. In order for the effect to be more evident, we will consider an enlarged part of the image. There we can find relatively deep shadows, relatively bright highlights and midtones as well as fine details.

Default grain parameters are supposed to produce a relatively delicate effect with a minimum grain size = 1, roughly representing a high-sensitivity (i.e. grainy) emulsion within the frame size between 35 and 70 mm.

Since grain has texture and forms a structure, the minimum size of granules has certain dimensions and therefore is represented by a group of pixels. Grain cannot be smaller than a certain size, as this would turn it into noise.
Maximum Amount (100) increases the optical density of grain making it non-transparent at all:

At high Amount values, irregularities in grain distribution in emulsion layers and cluster formations can be clearly seen.
Grain is controlled separately in shadows, midtones and highlights. For example, this is how grain looks like when set to a minimum Shadows level = 0:

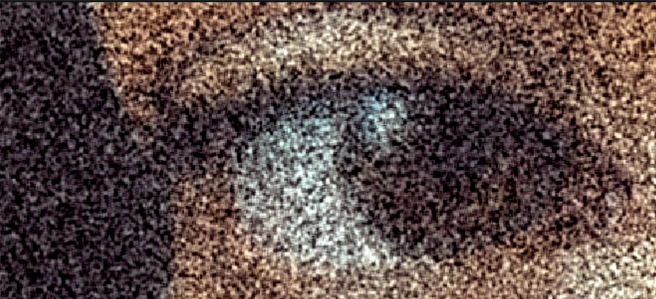
As grain amount in the shadows increases to 100, granules become more visible in the darkest areas. In this case, no flat blacks appear in the image – this is how real film works, without ‘clipping’.

When we’re increasing shadows grain amount significantly, new ‘details’ appear and the absolute black point may slightly increase (although originally it was absolutely black).
The maximum grain size of 10 approximately corresponds to a high-sensitivity (i.e. grainy) emulsion within the frame size between 8 and 4 mm (if such film existed). We’ve made the maximum size large enough intentionally to allow more flexibility.

At the maximum values of Size = 10 and Amount = 100, it is clearly visible that the grains in Dehancer Film is volumetric, while the overall texture is formed by grain clusters, not individual granules. This is due to natural irregularities in emulsion as well as physical and chemical processes of exposure and film processing.
In Dehancer Film color gamut as well as the colour-contrast characteristics of the film dye and grain correspond to the gamut of the selected film. If grain is applied without film profile, maximum Chroma value corresponds to a hypothetical colour film with extra saturated dyes.
At the same time, you can control grain color with the Chroma parameter, which determines the color micro-contrast of the dye granules.
Minimum value of Chroma = 0:
Maximum value of Chroma = 100:

The Film Grain tool allows you to control not only the parameters of the grain, but also its type.
Negative grain is more pronounced in the highlights and the image has a slightly higher microcontrast, which is more typical for negative films.
Positive grain uses the ‘classic’ algorithm that reproduces a softer grain, which is less pronounced in the highlights and is more typical for positive films.

Film Type = Negative

Film Type = Positive
In some cases, performance is the priority, while quality and authenticity are of secondary importance. A good example is Youtube, where grain is subjected to strong compression during transcoding. For such situations, we have added a Film Mode parameter that allows you to select a simplified but faster experimental digital grain.
Analogue is the original type of grain that requires more processing power but results in lifelike simulation.
Digital (Experimental) is the high performance simplified grain that may be useful for dithering tasks (for example, to eliminate the posterisation), for social networks with strong compression and for low-resolution projects and draft or daylies rendering.

Mode = Analogue

Mode = Digital (experimental)
Described parameters allow precise adjustment of grain in a very wide range from an almost clean image to very grainy. At the same time, any combination will give a result similar to the real grain – as much as it is possible with a digital image.
You can see an example of adding a large grain in dynamics in the following video (don’t forget to open the full window mode to see the grain):
Update:

Optical resolution of any film depends not only on the grain size but also on many other characteristics – coating type, film base thickness, etc. That is why we have added Film Resolution parameter in Film Grain tool.
Resolution parameter set to 100 keeps the initial level of detail of the source media.
Lowering Resolution results in gradual loss of detail, while the image becomes more blurred.
Resolution set to 50 matches the visual sharpness in the previous versions of Dehancer.
Since the tiniest detail on film couldn’t be smaller than the grain size, it’s recommended to always lower the Resolution parameter a bit, according to the current grain Size and Amount settings.
Please, don’t worry about your current projects, this update doesn’t affect existing settings.
Also, you can watch our 15-minute video in English about how Film Grain tools works in Dehancer.
Authors:
© Pavel Kosenko
© Dmitry Novak
© Nailya Safarova
© Denis Svinarchuk