

Image contrast adds punch, depth and perceptual saturation, giving your image a finished look.
There are various tools in Dehancer, and the plugin is designed to treat the image as gently as possible. But sometimes, especially when the high contrast source meets extreme adjustments, clipping in shadows and highlights may occur.
Contrast in Dehancer
In Dehancer overall image contrast is managed with the two main modules: Expand and Print.
Other Dehancer tools also contribute. For example, Grain slightly reduces the contrast, giving more headroom in shadows and highlights, while the Vignette tends to naturally increase contrast across the frame, darkening the edges.
Tonal corrections (including those made outside of Dehancer) summarise, and eventually this can lead to clipping. So, let’s solve the case from the beginning.
Source interpretation
Even though the source file contains a lot of information, thoughtful interpretation of Log / RAW clip is essential with color grading. There are several methods:
- Input camera profile in Dehancer
- CST, Color Space Transform node
- IDT, Input Device Transform profile (ACES pipeline)
- Camera vendor Lut
- DaVinci Camera RAW settings (for RAW clips)
- Manual de-Log using curves, wheels and other DaVinci color correction tools
- Manual de-Log using Dehancer adjustments
Each method has its own benefits and drawbacks.
For example, CST profile typically delivers accurate colors. But sometimes this transformation may lead to the excessive contrast and even produce the obvious image clipping, without headroom for further processing. The same can happen with any profile or Lut.
Fortunately, if you encounter a similar problem, you can choose and adjust your interpretation method, according to the characteristics of the particular clip.
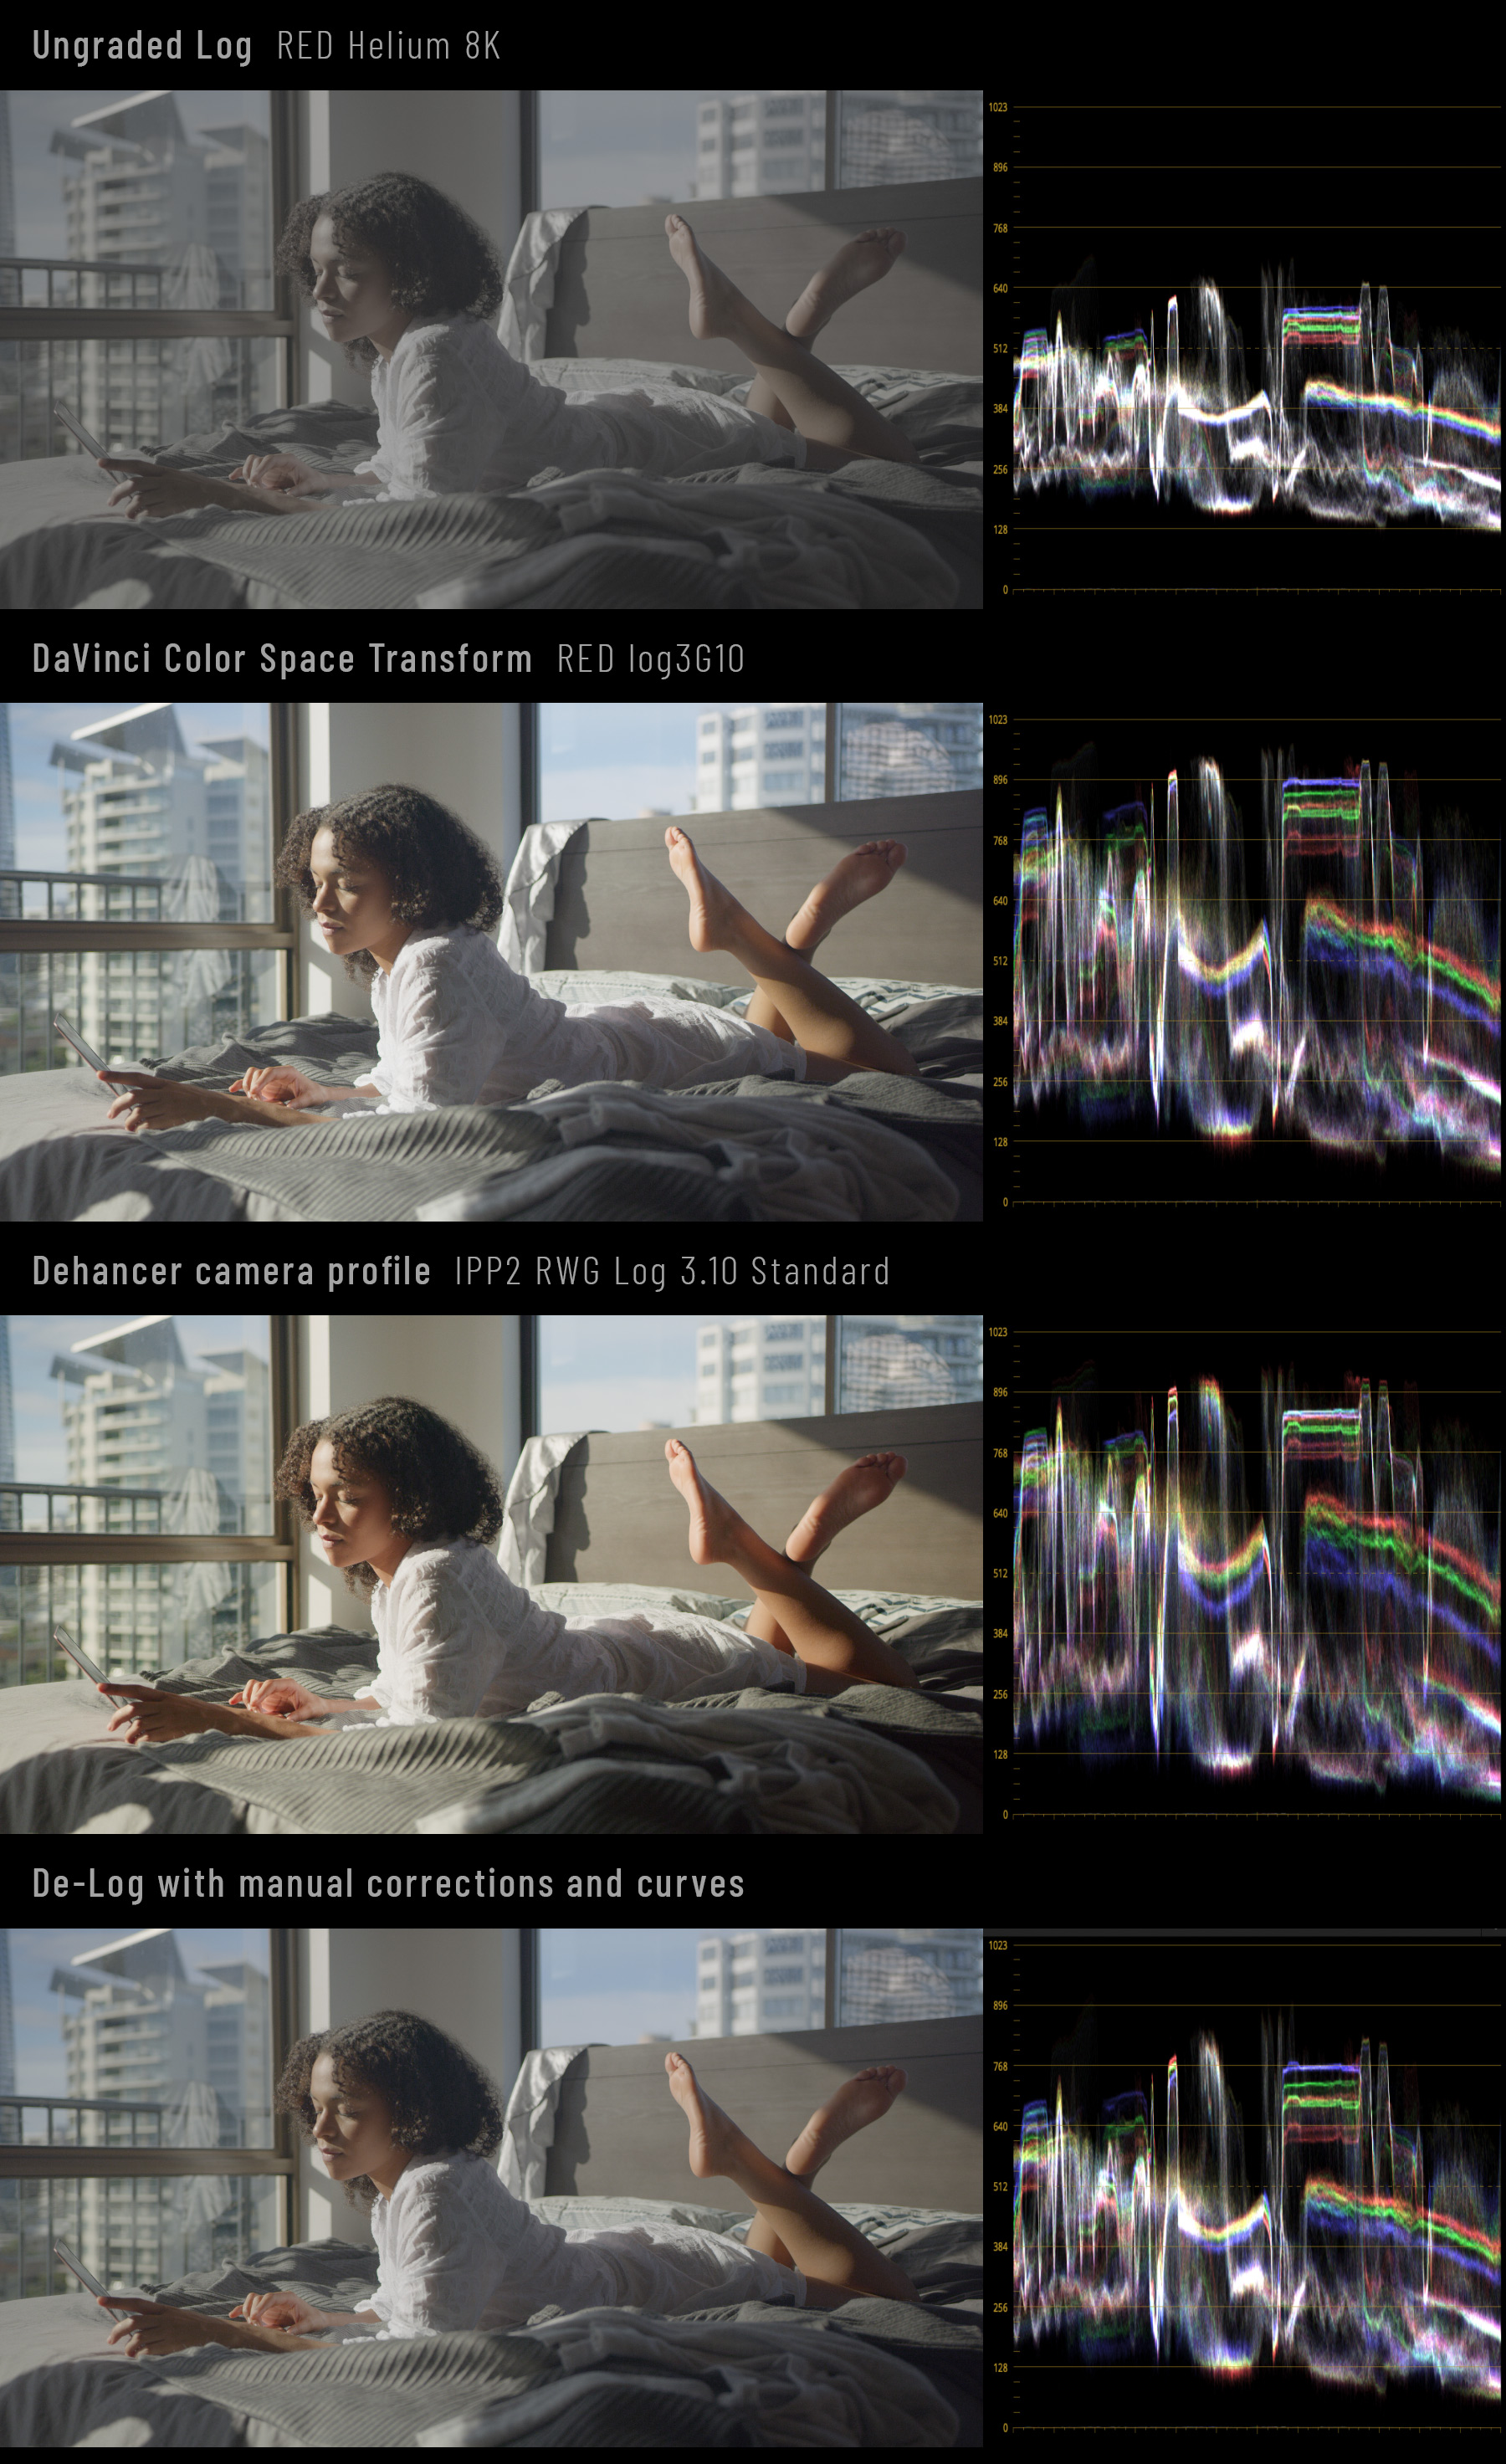
Notice how differently the same clip can be interpreted with different tools.
– DaVinci CST is well balanced but there’s no enough headroom in highlights.
– Dehancer camera profile has a very good color separation and overall aesthetics, but the relatively high contrast can make further processing a bit tricky.
– Manual de-Log with custom curves saves detail in shadows and highlights and makes processing more flexible.
Vignette
Note that Dehancer’s Vignette not only affects the exposure but also increases contrast between the edges and the frame center. That’s why if you are willing to use this tool we recommend to enable and adjust it at the beginning of color grading process.

As clearly seen here, Vignette adds overall contrast, while shadows become almost clipped in the lower right corner.
Push / Pull
All films behave differently depending on how much light they received during exposure.
Exposure correction during shooting is a technical and creative tool that allows you to deal with low-light situation and to vary color-contrast look of the scene. In Dehancer film exposure is implemented with the Push/Pull (Ev) tool.
Push / Pull can be a good helper in clipping control, since contrast greatly depends on film exposure. With negative films it affects overall color and contrast. With positive films Push / Pull allows to set the desired slide exposure, opening blocked shadows or protecting blown-out highlights.
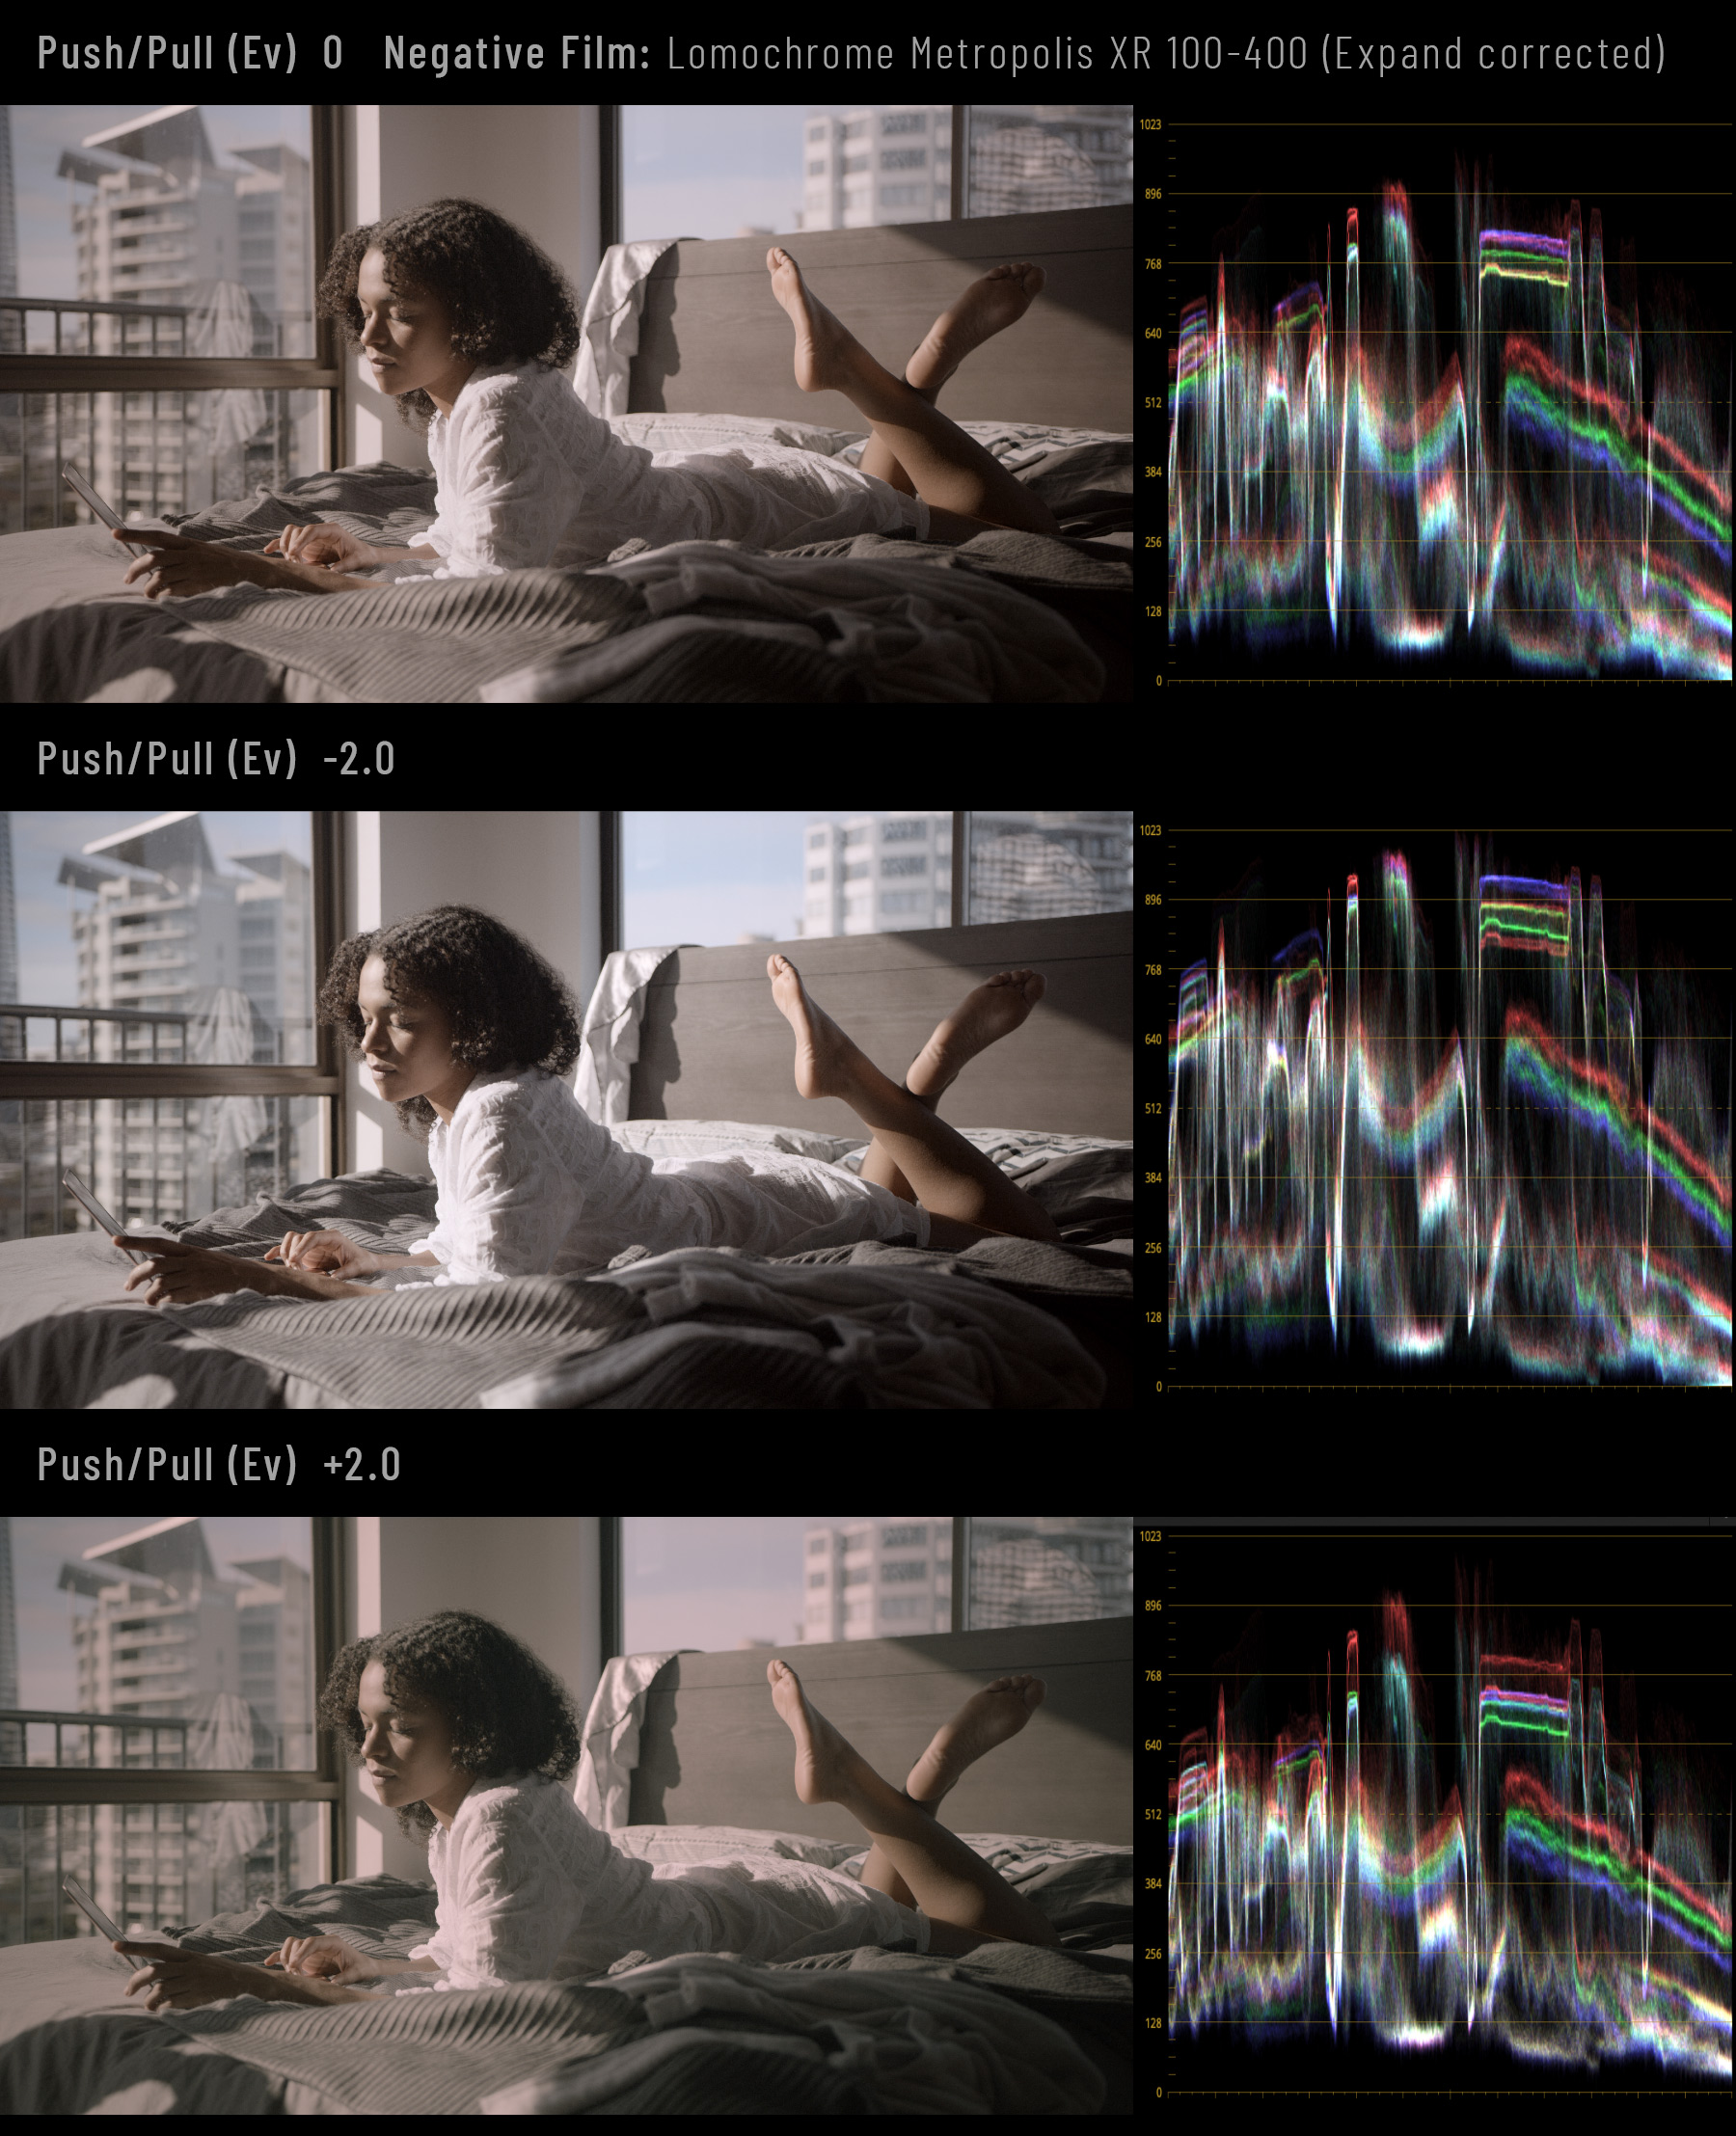
Push/Pull acts differently with different films, but here you can observe the typical behaviour of the negative film printed on photopaper: underexposure adds contrast while overexposure softens the image.
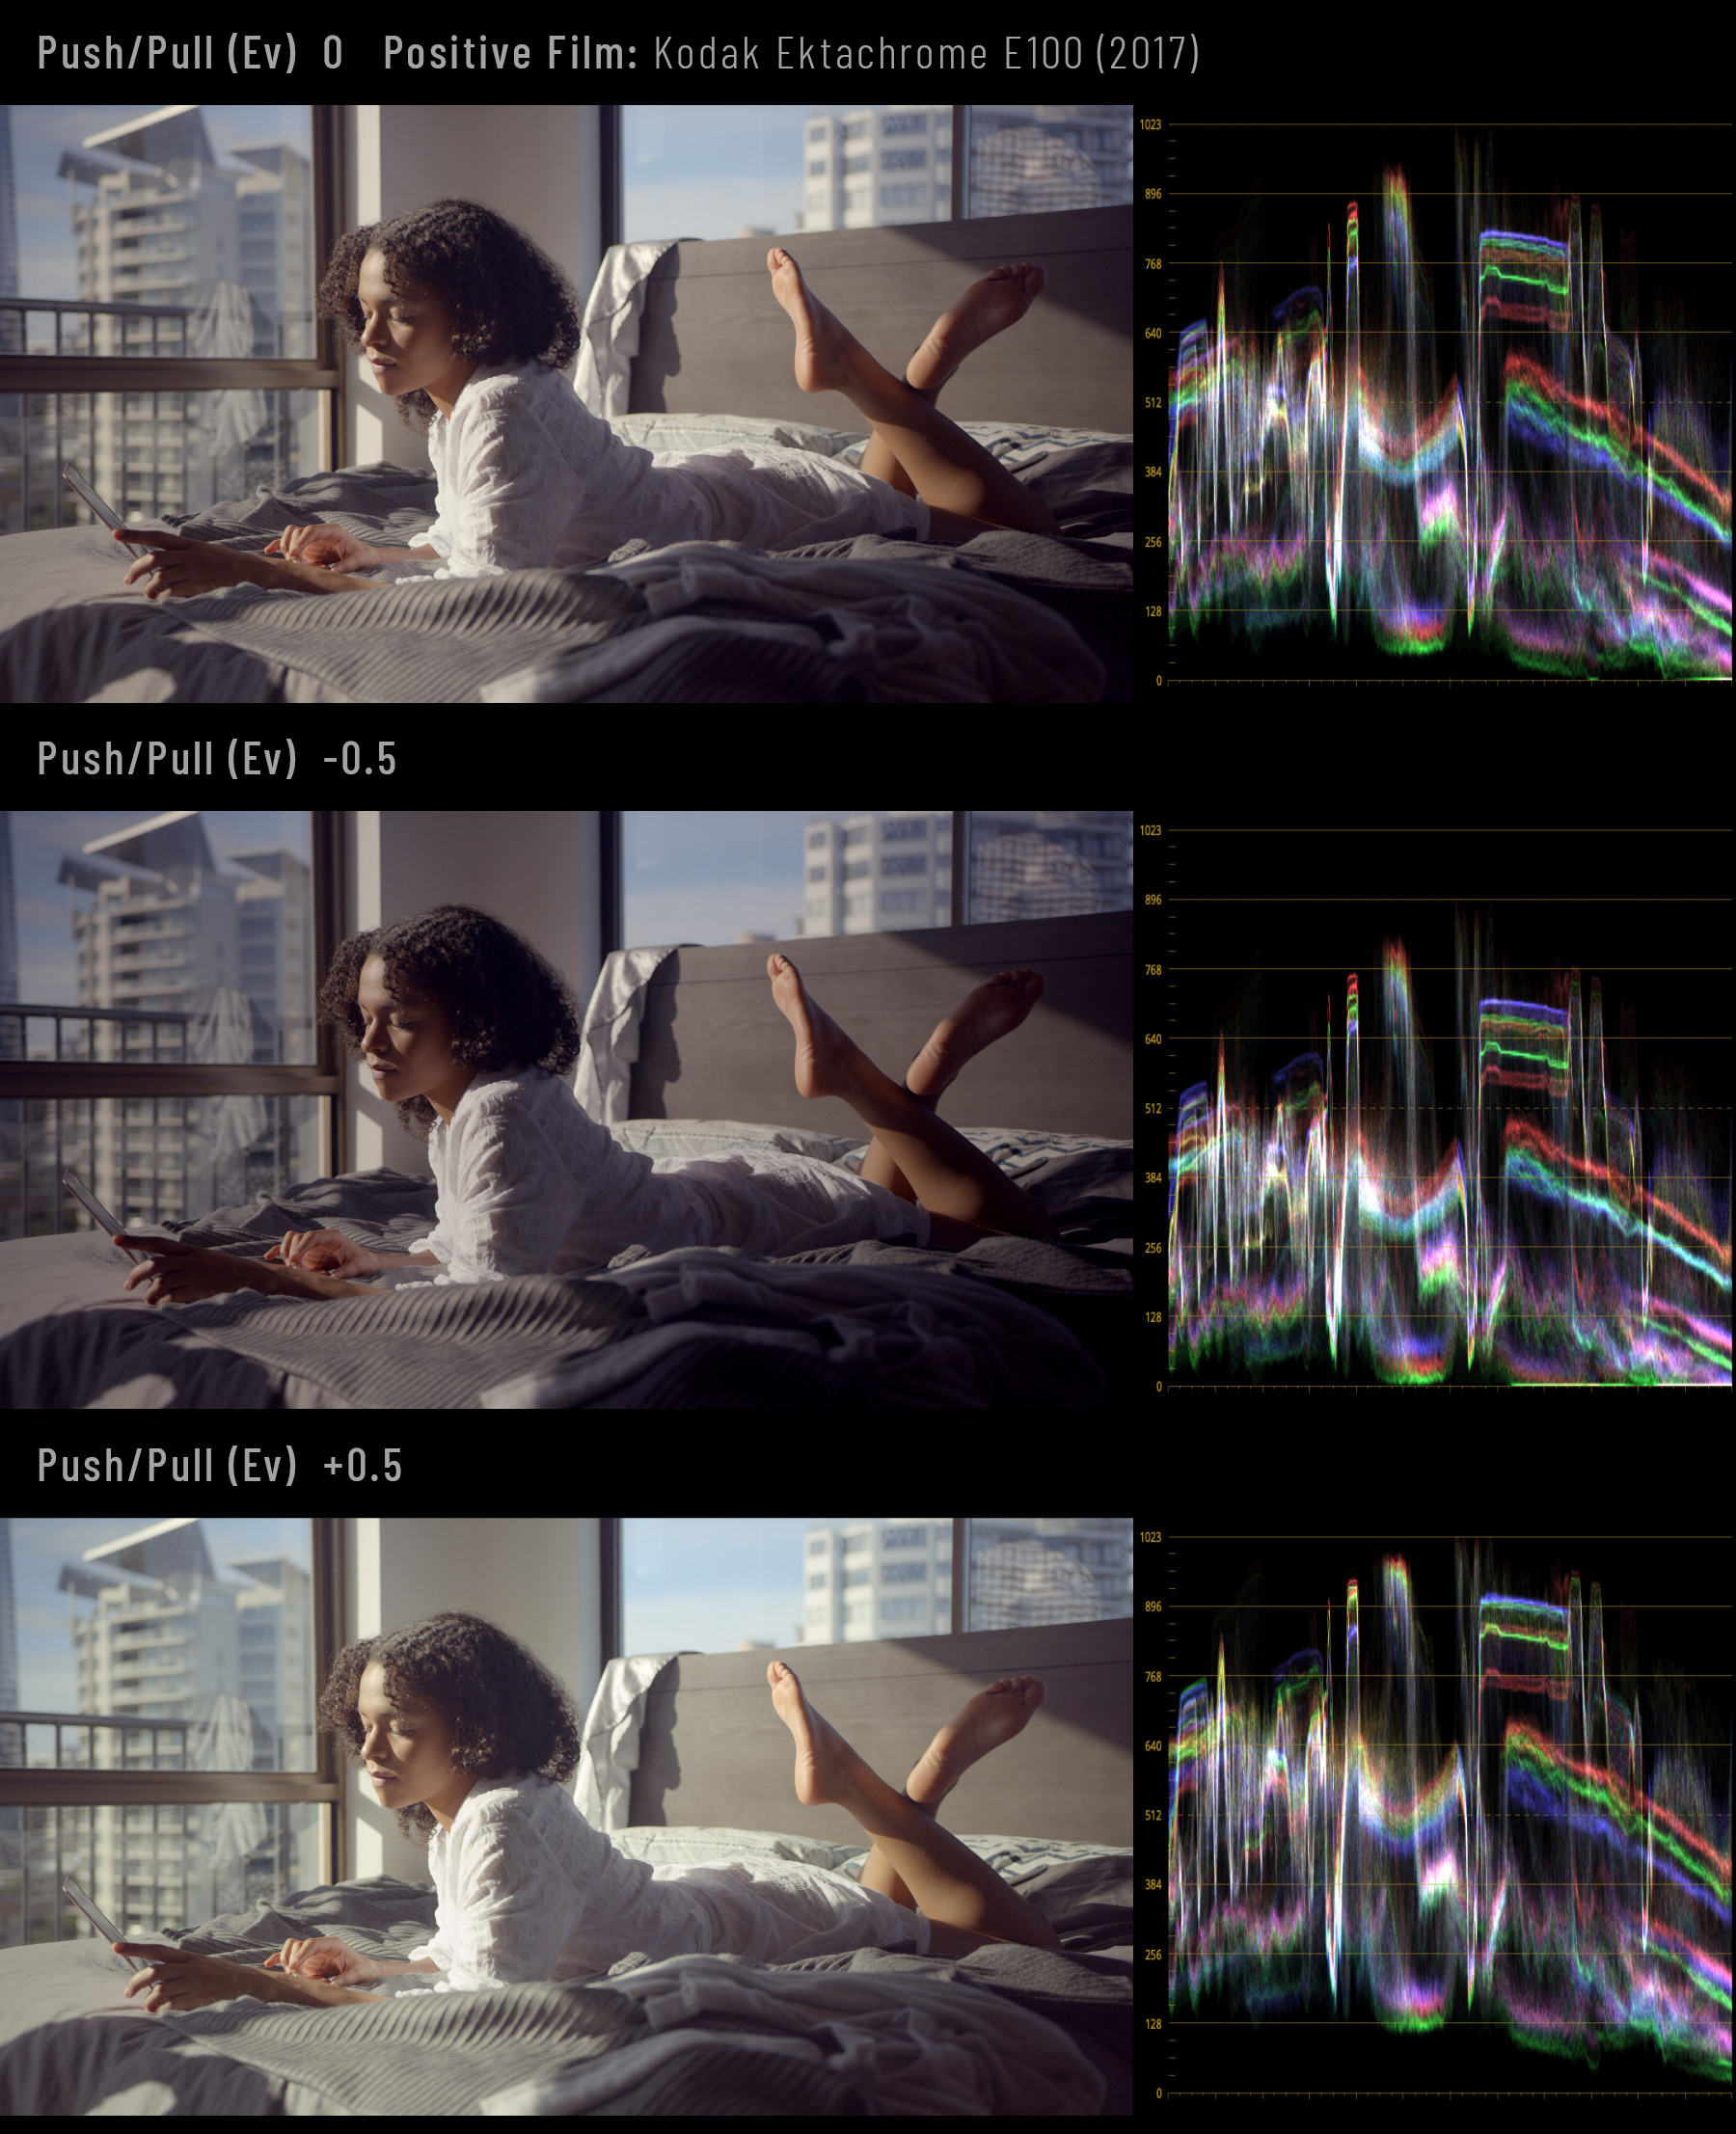
Famous Kodak Ektachrome E100 (2017) positive film behaves as expected: Push/Pull here acts as film exposure control.
Expand
In general, Expand tool may be considered a kind of technical correction. But it’s not just a simple Levels-like adjustment.
In the internal processing chain Expand is applied to the film profile itself to make a ‘final scan correction’. So it does not correct the result of the applied film profile, but rather adjusts the profile itself, so that its dynamic range corresponds to the contrast of the source image. Therefore, the information in shadows and highlights is compressed, thus avoiding hard clipping in most cases.
We recommend adjusting Expand immediately after film profile selection (although you will probably revisit this tool several times).
First set the black and white points to ‘fit’ the image into the dynamic range of your timeline color space. Clipping control is essential at this point, so keep an eye on the Waveform.

Lomochrome Metropolis is quite a contrasty film on its own, but it needs a tiny Expand correction as well.
Usually, at this stage, the image already has a more or less technically finished look. Next, you may want to manipulate the Exposure, Contrast and other ‘printed media’ parameters creatively.
Note:
We decided to intentionally remove the Auto Expand option as it sometimes produced misleading results. The best option is to adjust the white and black points manually from scratch to get more control and more deliberately chosen contrast solution.
Tonal Contrast
Although we can apply negative values to the Tonal Contrast tool to visually ‘soften’ the image, basically we are increasing Tonal Contrast to give more punch to the image. But with a strong, extreme correction it may add up with other tools and produce clipping.
Even though Tonal Contrast uses sophisticated non-linear compression, it may lead to soft clipping at high values, especially when the source media has its own high contrast.
If this happens it is just the time to revisit Expand and set a more ‘relaxed’ cutoff for black and white points.

Even a slight increase in Tonal Contrast leads here to clipped shadows and harsh highlights. Expand re-adjustment brings back details leaving overall texture and punch achieved with Tonal Contrast.
Quite often this problem cannot be solved solely by readjusting the Expand parameters, because the source contrast and Print settings also contribute to the clipping, while Expand is defining the dynamic range for the film profile itself, not for the source clip.
Then it’s time to try Analogue Range Limiter.
Analogue Range Limiter
By default, Print options work within the boundaries of ‘digital’ contrast range. Black and white points are normalised to digital brightness values of 0 and 100, respectively.
However, we make it possible to obtain an image in a softer way, typical for analog media.
With the Analogue Range Limiter checkbox enabled, the uncorrected black and white point values are used as they were measured on the reference prints. Thus, the image becomes softer, with improved detail at the edges of the tonal range – in deep shadows and bright highlights.

Analogue Range Limiter is a quick solution when you need more headroom to eliminate possible clipping.
Film Grain
Dehancer Film Grain naturally softens the image and affects black and white points, lowering visible contrast.
On the real film grain lives in both deepest shadows and lightest highlights. But the fact is that grain cannot exist (and therefore be visible) in pitch black or pure white tones. White is white and black is black, it means – no detail and, respectively, no grain at all.
Thus, applying grain in Dehancer always gives slightly more headroom in shadows and highlights.

Very high Film Grain values used here for illustrative purposes, just to demonstrate how grain affects image contrast.
Save Lights in Bloom
Bloom tool in your Dehancer look may be responsible for some blown-out highlights. And that’s exactly what we have provided for your convenience – the Save Lights parameter. Use it to eliminate any clipping introduced as a side-effect of Bloom.

Save Lights simply does what it’s supposed to do, protecting highlights from possible clipping induced by Bloom effect. Lowering this value results in clearly visible clipping in highlights.
Back to the source correction
In some cases the above-mentioned methods do not allow to recover shadows and highlights completely. In this case it is recommended to go back to the first node and give your source some headroom:
- Use Lift, Gamma and Gain wheels
- Adjust the Shadows and Highlights parameters
- Lower the contrast in Camera RAW settings
- Use curves for more precise tonal control
- Adjust the Color Space Transform CST settings or try the another Input Device Transform IDT profile (when working in ACES) to get a softer de-Log