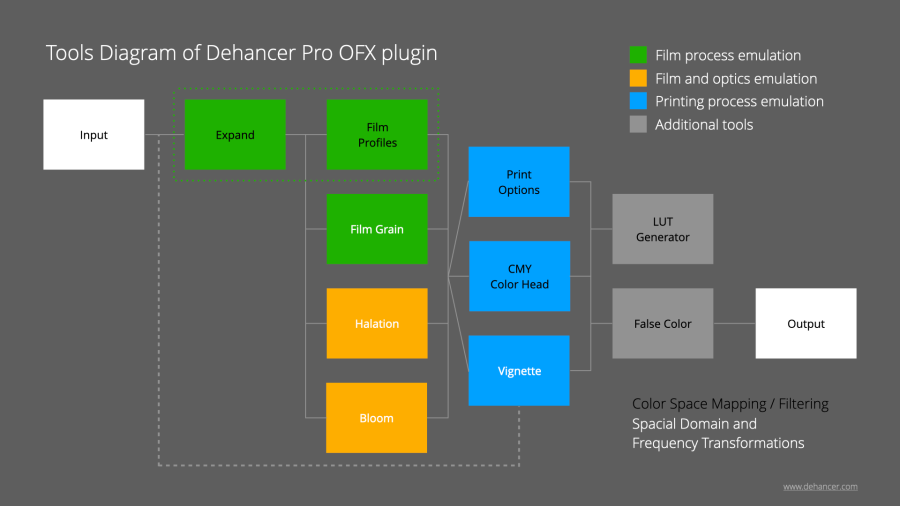
Dehancer Pro OFX plugin provides a rich toolset for realistic and high-quality film simulation. To give colorists a better understanding of how it works, we have developed a diagram showing the internal tools structure and their relationships.
Usually image processing is considered as a linear sequence of tools and filters, which are applied sequentially, one after another. Within Dehancer Pro, the processing of source material has a more complex hierarchy, where the nodes may be arranged into several parallel ‘layers’, but also interact with each other in different combinations and sequences.
However, the interface of Dehancer plugin represents a typical pipeline, which is most convenient for the colorist.
Dehancer image processing chain includes both the transformations of the source data and the preparatory analysis for further transformations. Both analysis and transformation can be performed with input data obtained not only from the previous but also from earlier stages of processing sequence.
The transformations are in turn categorised into color (Color Space Mapping / Filtering) and spatial ones (Spatial/Frequency Domain Transformations).
It is quite difficult to show such a complex structure in a two-dimensional scheme. Therefore additional text comments are required for better understanding.
This scheme can be roughly treated as a node diagram in DaVinci Resolve. Parallel ‘nodes’ are mixed with each other in certain modes. In DaVinci Resolve, there are no direct analogies to the blending modes used in Dehancer. But for simpler understanding you can treat them in a such way.
Expand and Film Profiles
It’s not an easy task to place the Expand tool in the Dehancer Pro diagram. But we decided that the most correct location would be between the Input and Film Profiles modules.
The idea behind Expand is to make a ‘final scan correction’, and it would be logical to apply this tool immediately after the film profile (similar to typical Levels, which are commonly used for such correction). However, an important advantage of Expand tool is that it does not correct the result of the applied film profile, but rather adjusts the profile itself, so that its dynamic range corresponds to the contrast of the source image at the Input section.
Therefore, when the black and white points correction is performed, the information in shadows and highlights is not clipped by post-correction, instead it is compressed by the profile itself, thus avoiding hard clipping and smoothing the roll-offs.
This makes an important difference between Expand and ordinary Levels or similar tools.
In other words, Expand is one of the ‘attributes’ of the film profile itself, namely its contrast properties. With the help of Expand we can match the desired film contrast to the scene you are shooting. In real life there is no different contrast versions of the same film, but in the digital world we can match the contrast of the film and the scene.
Print Options and Color Head
In fact, Color Head is one of the printing parameters, because it is impossible to make an optical color print without using YMC filters. But there is so many controls in Color Head tool that we decided to put it in a separate group.
Vignette
It’s also difficult to accurately show the location of the Vignette tool because in the analysis and processing chain because the exposure information is taken from the source image but it’s applied at the printing stage. This makes vignette more lifelike, taking into account the effects of other tools.
That’s why we suggest treating the Vignette tool as one of the types of manual masking in the printing process.
LUT Generator
LUT Generator is basically used for on-stage grading purposes (also called DIT). Since the LUT format itself is capable of storing only color transformations (Color Space Mapping / Filtering) and is not able to represent Spacial Domain and Frequency Transformations, all relevant tools are ignored when using it. In the diagram, their names are marked in white. The tools that contribute to the LUT are marked in black.
By the way, this clearly demonstrates why it is incorrect to make analogies between Dehancer Pro and the LUT collection. Dehancer is not a set of LUTs (presets, looks, etc.), but a much more advanced film simulation tool. You cannot replace Dehancer with a set of LUT files.
Thank you for your attention. We look forward to hearing from you and always ready to answer your questions.
Read more about how Dehancer works in other articles.
You can download and try Dehancer for free, as well as buy the plugin on our website:
https://www.dehancer.com
For a 2-week Promo license, please request [email protected]
Authors:
© Pavel Kosenko
© Dmitry Novak
© Denis Svinarchuk

